Lab1 Intro to RARS
1 Objectives
Following completion of this lab you should be able to:
- Determine the value stored in a register in RARS.
- Determine the contents of memory in RARS.
- Determine the location and contents of static data in RARS.
- Run RISC-V programs using RARS.
- Set break points and use them for debugging in RARS.
- Understand the implications of pseudo-instructions such
li(Load an Immediate value into a register). - Use the R-type instructions such as
addin a program. - Use an S-type instruction (
sw) in a program. - Use the I- type instructions such as
oriandlwin a program. - Read, modify, and write a program in RISC-V assembly language and document it properly.
2 General
- This lab should be completed by each student, but you will work in collaboration with a partner assigned to you by your instructor.
- Bring your text book to lab.
- Read the lab instructions completely before beginning.
- The RISC-V instruction set is summarized on page 70 of your book (Figure 2.1).
- Don't hesitate to ask for help.
- You will be filling in the lab questions sheet during this lab, and uploading it to gradescope. Either download the Word Doc version and add your answers, or print the web page to PDF and add answers to the PDF.
- Write both your name and your partner's name on the lab question sheet
3 Installing RARS
RARS is a Java program and should work on any machine that supports a Java Virtual Machine.
If you need java, you can get it here.
Download RARS from here or from the main RARS webpage:
https://github.com/TheThirdOne/rars/releases. We will use this program throughout the course, so put it somewhere you can keep it long term.
On Windows and MacOS you should be able to double click the .jar file.
Sometimes you need to launch it from a command line. Example for running it from a linux command line:
> java -jar rars_27a7c1f.jarNote some MacOS machines will not allow normal file navigation unless you launch the jar from the command line using the linux instructions above.
Some help and info pages are available on the RARS github page.
4 Get your repository
To get your git repo, you'll need the git tools installed. If you are using Windows and need to install git, see the git scm website. If you use a different OS, you should use the install method best for your operating system.
-
We'll be using Github For Education to manage repositories for this course. Read all of these instructions before you begin.
- You'll need to create a github account, your account name should be recognizable as your RHIT username.
- Use the pattern: "rhit-username", for example Robert's account name would be: "rhit-williarj".
- Even if you already have your own personal Github account please make a course-work specific account. We don't want to have to figure out who XxXSuperLuigi2022XxX is when we're grading. If we can't figure out who you are from the username we'll assume you didn't submit the assignment.
- IYou should set up SSH keys for github access. Scroll to the bottom of this page and follow the directions in "Fixing GitHub Authentication Issues". You can read details about that here.
- Go to this url to create your repository.
- You may be prompted to grant Github Education access to your account, grant access if asked.
- Select your Rose username from the list of students when you create your account.
- If your username is not listed select the "Skip to next step" link above the list of names. Tell the instructor you did this!
- Select "Accept this assignment" on the following page. This will create your repository copy the link on the nextpage it will look something like this: https://github.com/rhit-csse232/csse232-2324c-labs-joestudent
- you can click your custom link to view your repository on github.com. The github.com web page will display a green "Code" button with instructions on how to clone your repo.
- You'll need to create a github account, your account name should be recognizable as your RHIT username.
-
Check out a copy of your repository.
- Open a terminal window. For Windows, the program
Git Bashwill serve as your terminal. - Navigate to where you want your repo. For example:
cd Desktop - Use this command to get your repo, adjusting for your url from above.
git clone git@github.com:rhit-csse232/rhit-csse232-2324c-labs-joestudent.git
- Open a terminal window. For Windows, the program
5 Starting RARS
Launch RARS. A window should appear named similar to "RARS 1.5" with three panes.
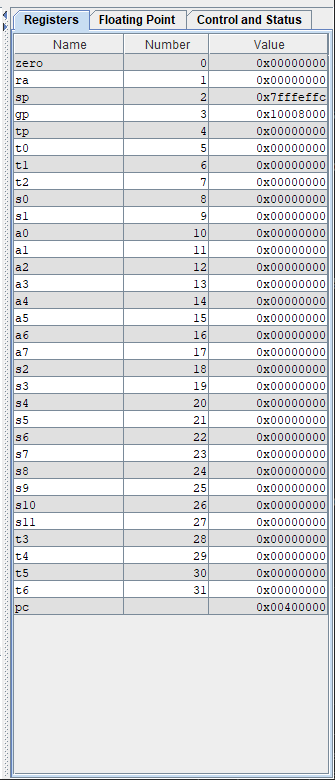
- The right-most pane shows the contents of the registers.
At the bottom of the register list is the
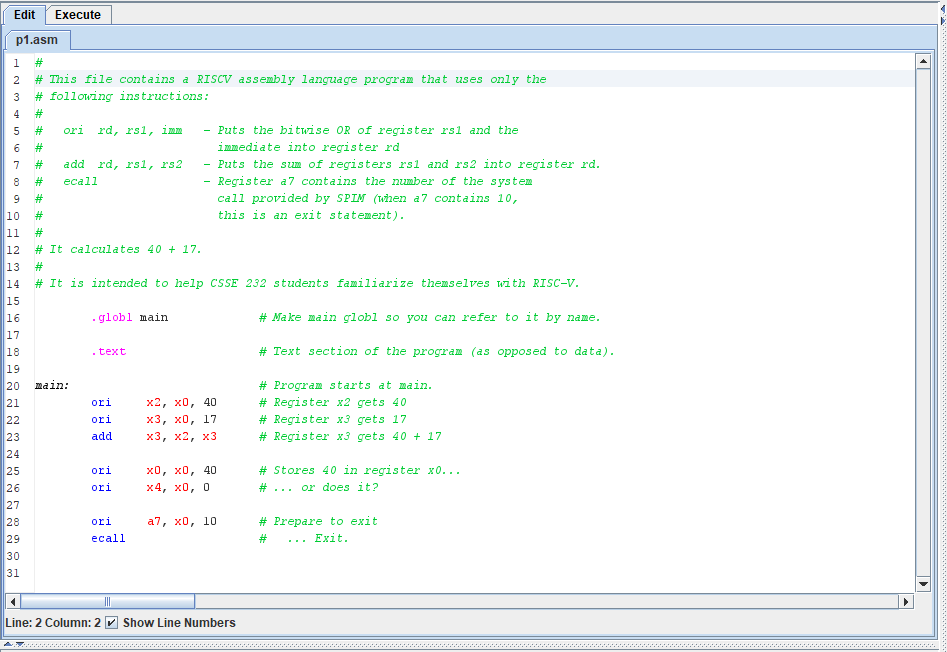
pcregister, which tracks the address of the current instruction. The tabs at the top of the pane allow you to look at control and status registers. If an error occurs in your code, the simulator might automatically show you the values of the "control and status" registers. We will not use these for a while, so you should switch back to the general registers for now. - The large upper-left pane shows the contents of the currently loaded file. It should be blank when you start up RARS. There are two tabs at the top of the pane.
- The
Edittab allows you to edit the currently loaded assembly file. - The
Executetab shows the assembled code and processor state as the code runs.
- The
- The bottom panel is the output console. The 'Messages' tab displays messages from the simulator. The 'Run I/O' tab shows any messages generated from the running program.
6 Running a Program
-
There should be a
lab01directory in your repository. Inside, there should be ap1folder. Inside that directory there should be ap1.asmfile. -
Open it in RARS, by going to File > Open and browse to your
lab01/p1folder. The file's contents should appear in the editor panel. -
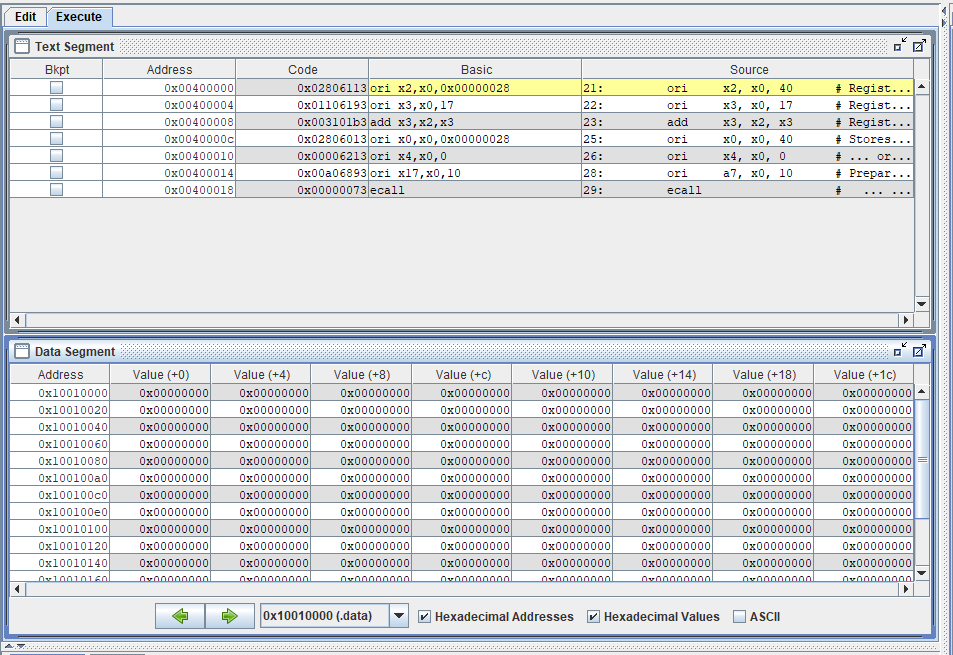
Click the Assemble button or go to Run > Assemble to assemble the file. The assembler will translate the assembly instructions into machine code ready for execution. RARS will automatically switch to the
Executetab. The execute tab shows two views of memory: the "text segment" (the program's instructions) and the "data segment" (the data stored for the program).-
The text segment window looks messy, but each instruction has five columns of data. The first column is a checkbox that allows us to set a breakpoint. The second is the address of the instruction. The third item is the hexadecimal representation of the machine instruction. The fourth item is (basically) the assembly language representation of the machine instruction. The fifth item (if it's present) is the actual line of code (and line number) from the source file that generated the machine instruction shown in the "Basic" column.
-
The data segment window shows the contents of memory, including the stack contents. You can jump to different regions in memory using the drop-down selector. For now, we'll only be concerned with the (.data) region.
Look at the text segment tab. Notice that instructions start at address
0x00400000and continues to address0x00400018. Also notice that the PC (program counter) register has the value 0x0400000. -
- When the program is assembled, the "ori x2, x0, 0x00000028" instruction will be highlighted.
- Notice the value of the PC.
- Notice that register 0 currently contains zero and register 2 currently contains a big number.
- Click Run > Step or use the Step button to run the currently highlighted line. Notice that
the contents of register
2have changed, and that the new value is shown in hexadecimal form. Finally, notice the value of the PC. - Predict the effects of executing the next three instructions (the
second
ori, theadd, and the thirdori). Answer the related question on your lab sheet. - Execute the next three instructions by clicking Run > Step three times. Did you predict correctly?
- The next instruction attempts to change the value of register
0to 40. Answer the related question on your lab sheet. - The next two instructions are an
oriand theecallinstruction. Notice what happens if you single step past theoriandecallinstructions. - Click Run > Reset or use the reset button. The register and text segment contents will return to the state prior to you running the program. This allows you to rerun the program easily.
7 Running a Second Program
- Open the file at
lab01/p2/p2.asmin RARS. - In turn, predict the effects of executing the first three
instructions (the first
ori, thelui, and the secondori). Answer the lab sheet question, then assemblep2.asmand simulate their execution. Did you predict correctly? - The next instruction in the source file is the first
li. Notice that it actually translates into two instructions. The reason is that the immediate cannot be represented in 12 bits. This will become more clear as we talk more about the machine language representations of the instructions). - Predict the effects of each of the two instructions and simulate their execution. Notice that the combined effect is the one intended by the assembly language programmer.
- The next instruction in the source file is the second
li. Notice that it actually translates into a single instruction, because the immediate can be represented in 12 bits.
8 Running a Third Program
- Open
lab01/p3/p3.asmwith RARS. Look over it, then assemble it. - Notice that the data segment has changed. The array A is stored
starting at address
0x10010000. Notice that each element of the array requires 32 bits, i.e. 4 bytes, of storage, and that RARS lists 8 words per line, so every 32nd address is displayed. The array has 15 elements, and the variable h is stored immediately following the array, so it is at address0x1001003c. - The first instruction in the source file is an
la, which expands toauipcandori. Predict its effects and simulate it. Do the new contents of registerx5match the assembly language programmer's intent? - Do the same for the remaining instructions in the program.
9 Writing a Program
Modify the p3.asm by completing the TODO blocks:
-
Add your name to the file
-
Compute the sum of the last three elements of the array
Aand store the result in a new global memory variable calledtotal. Look at the variablesAandhinp3.asmfor examples of memory variables (don't changeAorh). Remember that the array is zero-based and that each element requires four bytes of storage. Add your code after the existing statements inp3.asmbut before instructions to exit the simulator. -
Once you think your program is done, you need to run some tests to verify correctness. Enable Settings > Assemble all files in directory, then remove the comment on the line
#jal runtests. Make sure your code passes all tests before you submit it. Complete the last two questions on the questions sheet now.
10 Turning It In
-
Submit the answers to the questions contained in the lab guide using the question sheet via gradescope, only 1 per team (make sure all team member's names are included). In gradescope you are able add your team members names to the submission, make sure you do so. When you are prompted to indicate where the "code question" is on the answer sheet, just select the first page of the assignment, you DO NOT upload code to gradescope. You can find the gradescope link on the course moodle page.
-
Lab code will be submitted to EVERY team member's git repository. You must include your name in a comment at the top of all files you submit. BOTH PARTNERS MUST SUBMIT CODE FOR ALL THE LABS.
- Be sure to include your name (and on future labs your partner's name) in all of your files.
- Open a terminal window and to navigate to your
lab01/p3folder. - Add the changed file with:
git add p3.asm - Commit the changes with a commit comment:
git commit -m "YOUR COMMIT MESSAGE" - Send the changes to the server:
git push
-
Verify that your changes were pushed correctly:
- Navigate to your main repository directory.
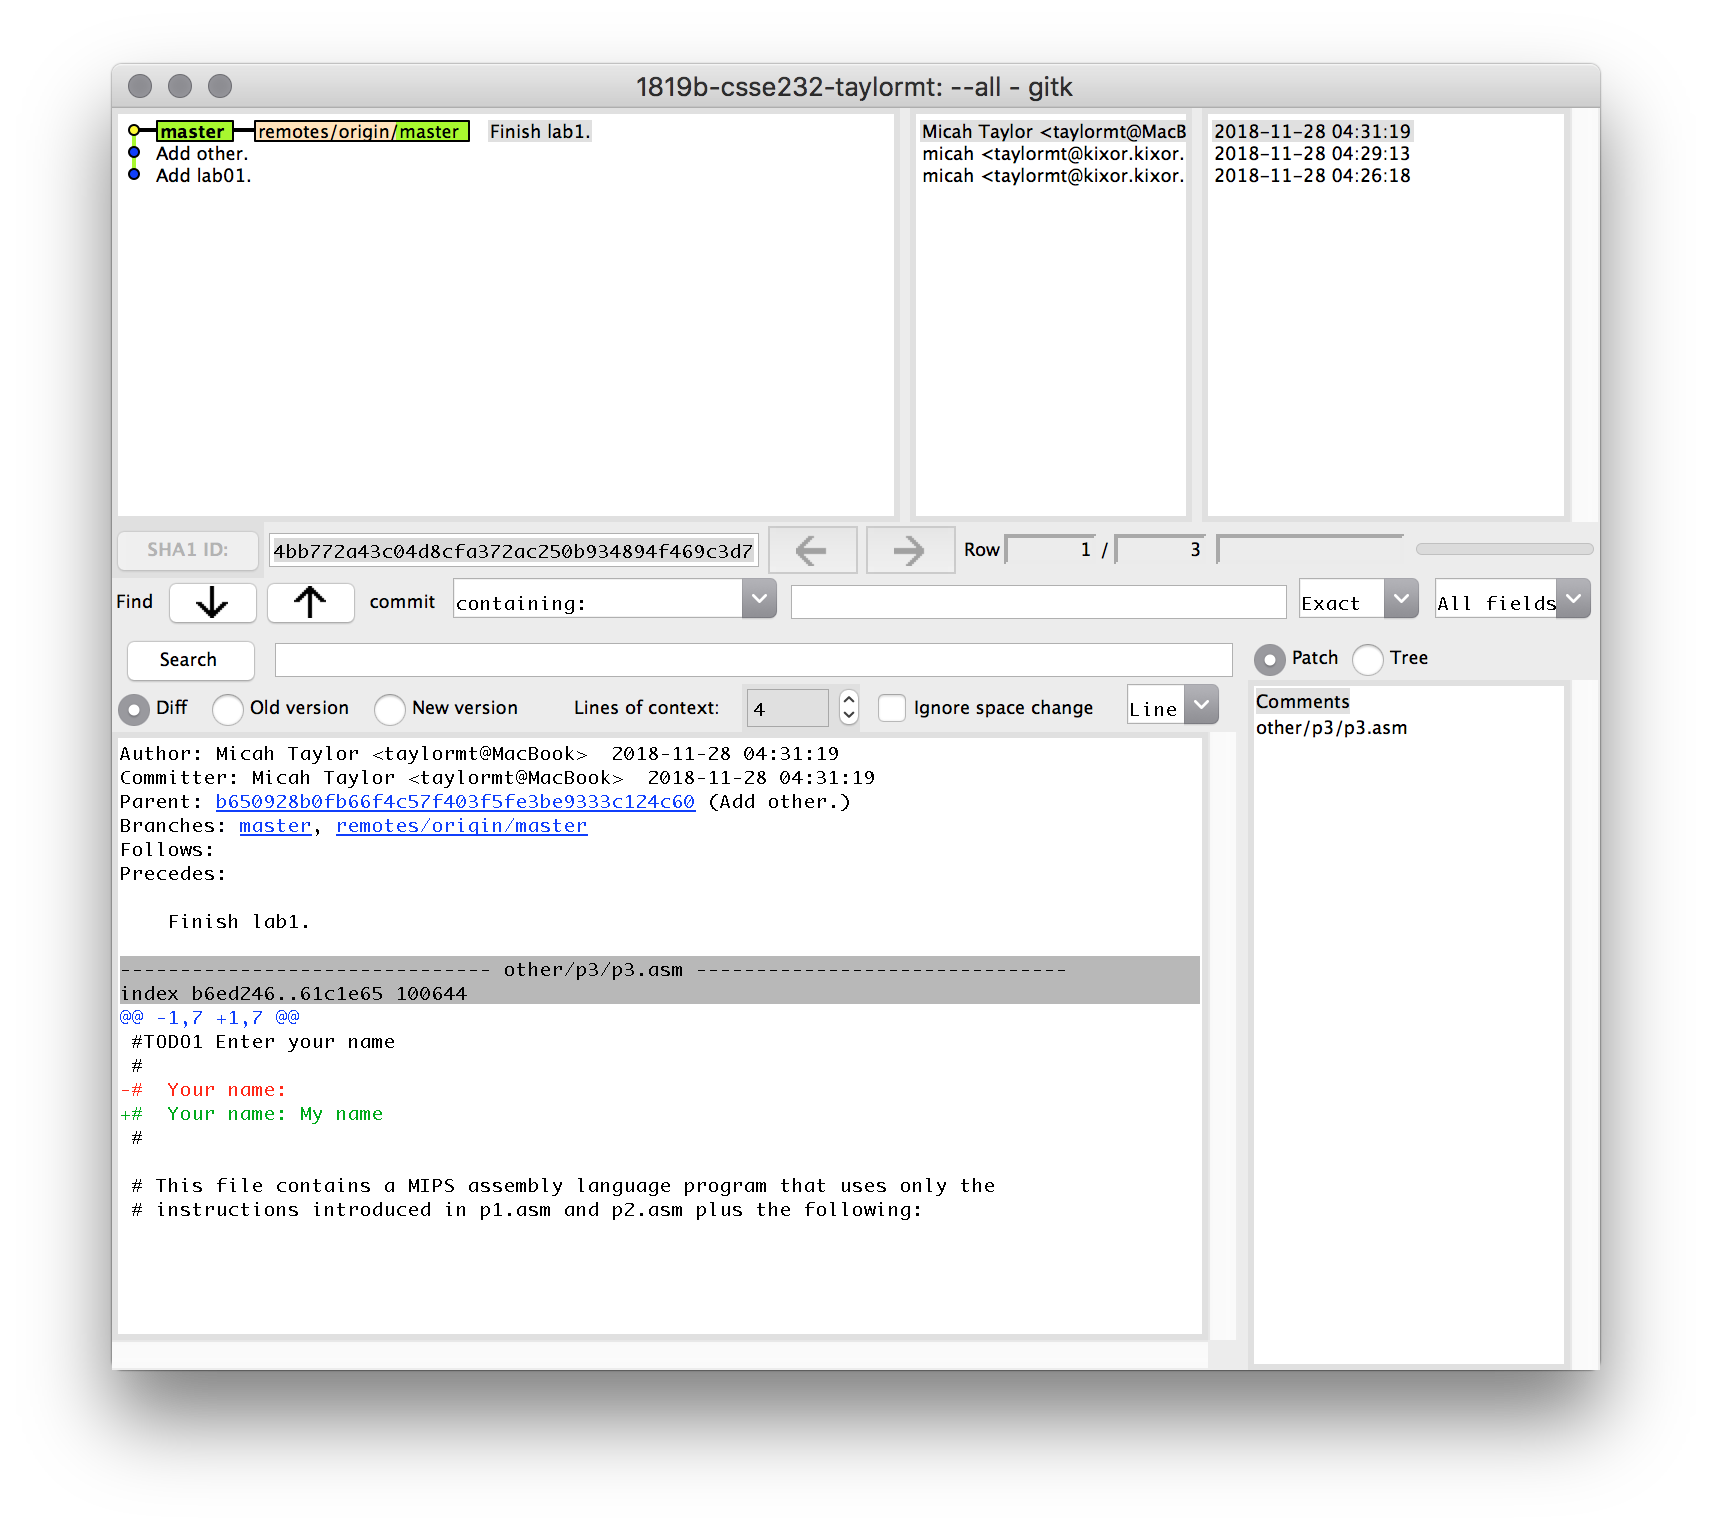
- Open a visualization of your repo with this command:
gitk --all & - You should see a series of file commits in the upper-left panel.
The data on your machine is marked by the green label
master. The data on the server is marked by the orange/green labelremotes/origin/master. - Verify that your commit with the new
p3.asmis on your local machine and also the server.
Now that you have your repo, for the next labs your will just update your repository by pulling with
git pull in your repo directory.
11 Fixing GitHub Authentication Issues
Here is a quick and dirty guide to setting up SSH keys if you have been having trouble accessing repos.
- Make an SSH Key
- Open "Git Bash"
- Change to the ~/.ssh directory (
cd ~/.ssh) - Generate an SSH key by typing
ssh-keygen- Hit "enter" any time it asks you a question (default RSA type, blank passphrase)
- display the contents of the new public key (
cat id_rsa.pub) - Copy all the contents it displayed (right click to copy in GitBash, ctrl+c won't work)
- Add the SSH key to your github account
- In your web browser, go to the github website.
- Open your account Settings on the github website (click the user icon in upper-right corner of the web page and choose "settings")
- Select "SSH and GPG Keys" on the left
- Click "New SSH key" green button
- Give it a name like "232 ssh key"
- Paste the key you copied into the large text box
- Click "Add SSH key" button
- Use the key to clone your repo
- In your web browser, open your new repository in the github web page (the URL it gave you when you first created it)
- Click the green "Code" button
- Note that it says "Clone with SSH": copy that URL (looks like git@github.com/....)
- Go back to Git Bash and git clone that copied URL