CSSE 232 - Computer Architecture I
Rose-Hulman Institute of Technology
Computer Science and Software Engineering Department
Exercise 4 -- Installing Xilinx
Upon completion of this lab you should have a properly installed,
licensed, and functioning copy of the Xilinx ISE tools.
You will be provided with the files to install Xilinx ISE version 6.3i
and ModelSim XE II v5.8c. Once installed, Xilinx ISE and the
associated tools will require nearly 1.9GB of disk space. Somewhat
more (that's the technical term) is needed during the installation
process.
Disclaimer: These instructions guide the user through the
process of installing Xilinx ISE, version 6.3i, avoiding several
pitfalls in the process. Using these instructions, dozens of students
have successfully installed the software on personal computers running
a variety of Microsoft Windows operating systems. However, such
systems are complex, and these instructions are not guaranteed to
avoid all problems. It is highly recommend that students
- ensure that their critical data is backed up in a safe
location before beginning the installation, and
- follow these instructions carefully.
- Run the program
 ISE Disk 1
 setup.exe (where
``
setup.exe (where
`` '' refers to the convenient location that you
chose in Step 0.)
'' refers to the convenient location that you
chose in Step 0.)
- In the ``Welcome - Xilinx Software Installation Window,''
choose the option to obtain your Registration ID using the
Website. A browser window will open. Follow the directions on
the website. Use an e-mail address that you can read in class and
that allows you to receive attachments.
![[*]](/Class/cs/icons/footnote.png) Use the Product ID:
LIF360818621.
Use the Product ID:
LIF360818621.
- Continue following the steps of the installation wizard,
accepting the default options.
- Be patient. The installation might appear to get ``stuck'',
but experience suggests that it will eventually move on and finish
successfully.
- Run the program
ISE Disk 2setup.exe (where
``'' again refers to the convenient location that
you chose in Step 0).
- When you get to the window ``Select Software Modules to
Install - Xilinx Software Installation'', do not install
the MultiLINX drivers. The website for Xilinx ISE warns of dire
but unspecified consequences of installing them under Windows XP.
It was enough to convince the authors of these notes not to
install them.
- You will be given the opportunity to search the Xilinx
website for service packs. Decline the option. You copied the
files to your local drive in Step 0.
- Find 6_3_01i_pc.exe under the convenient location
that you chose in Step 0, and run it.
- Decline the option to search the Xilinx website for IP
updates, for the same reason.
- There are no IP updates at this time.
- Press ``Continue'' and then when asked for the location of the
license file, specify the above location.
- Unzip each of the following into
C:Modeltech_xe_starter in turn, replacing all
existing files:
- mxe5.8c_6.3isp1_simulation_libraries.zip
The following steps will test your installation.
- Create the folder
C:Xilinxprojects. Notice that
there are no spaces in this path (we mention this important detail
in case you stray from these instructions).
- Download
G:cssecsse2320405aXilinxTrip.zip
to a convenient location on your hard drive. Extract
trip.zip into
C:Xilinxprojects (where
``'' is the convenient location that you picked when
downloading.). If you're using WinRAR and it complains about some
of the contents of the ZIP file, you probably need to get the latest
version from
 tibia.
- Start the Xilinx Project Navigator.
- Click on File
 Open Project
- Navigate to your Trip folder and select
Trip.npl. Update it to the new version, and don't worry
about archiving it.
- You should see something like:
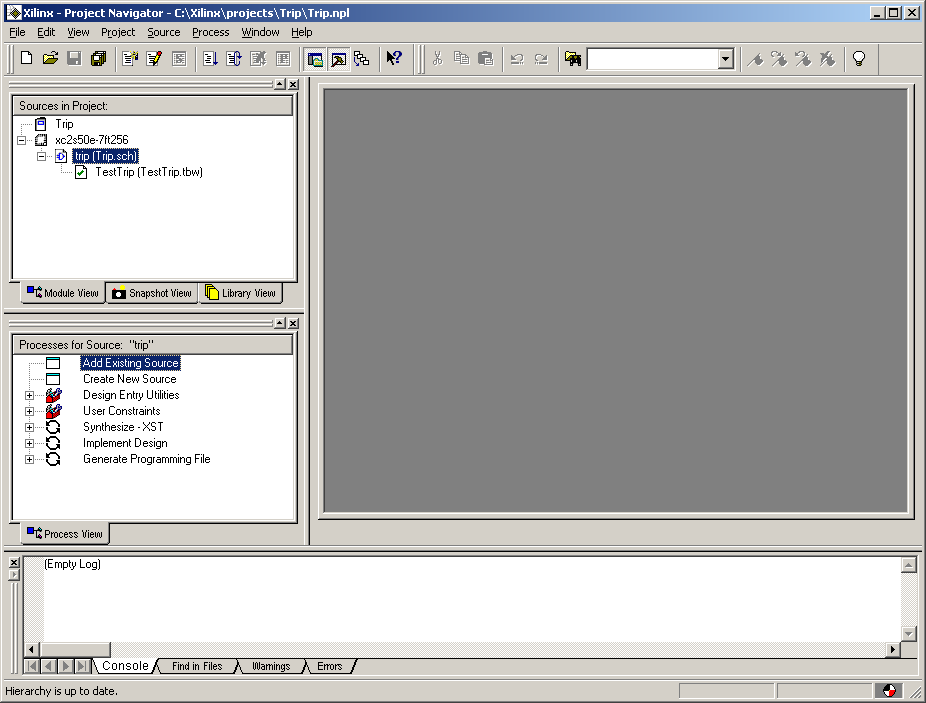
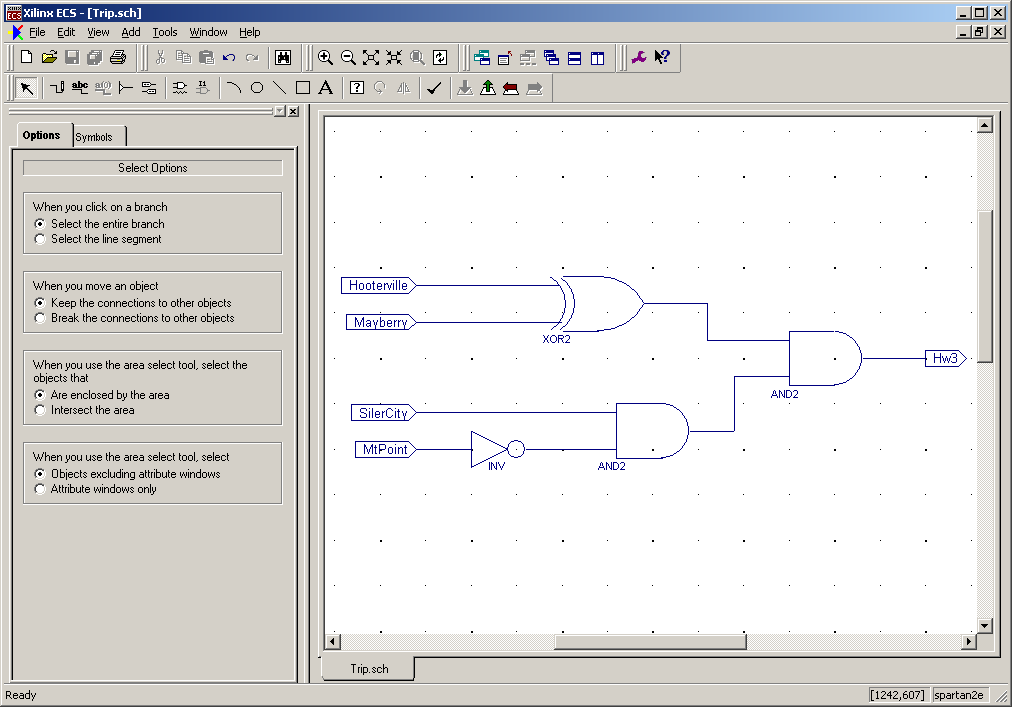
- Double-click on trip (Trip.sch). You will see the
circuit being simulated in schematic form.
- Go back to the Project Navigator and double-click on
TestTrip (TestTrip.tbw). Agree to update the ports. You
will then see test inputs and outputs for the circuit.
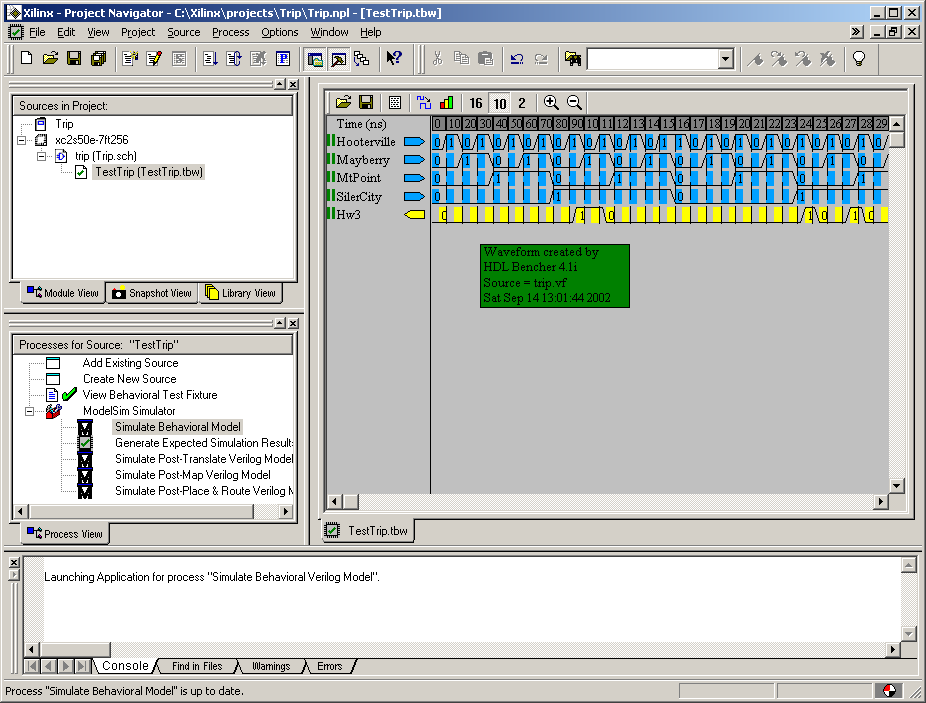
- Go back to the Project Navigator. With TestTrip
(TestTrip.tbw) still highlighted, go down to the lower left pane
and expand the
 next to Modelsim Simulator. Double-click on
Simulate Behavioral Model.
next to Modelsim Simulator. Double-click on
Simulate Behavioral Model.
- The first time that ModelSim runs, it will ask you if you want
to change some file associations. You probably don't need any of
them, and you can always create them later if you decide you want
them.
- After a moment, something similar to the following will
appear:
Note, the left pane of the window lists the inputs and output.
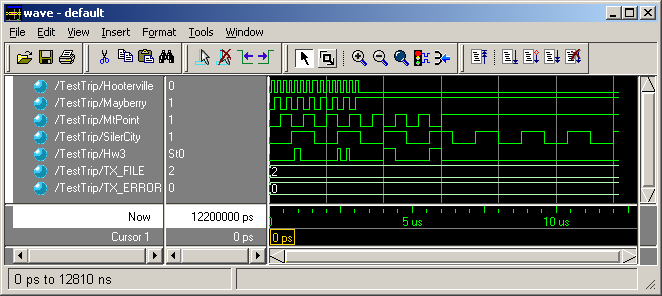
- Click the
 button. The right pane
should now show the value of each input/output at a given time. Are
the values correct? Click the
button. The right pane
should now show the value of each input/output at a given time. Are
the values correct? Click the
 icon to see more data.
Resources can be found at http://www.xilinx.com. The course
discussion group is an excellent place to post questions, answers,
tips, etc.
Footnotes
- ... attachments.
- We've not ben
spammed by providing an address here.
J.P. Mellor
2004-09-21