| Table of Contents |
Crummett and Western, Physics: Models and Applications,
Sec. 40-1
Halliday, Resnick, and Walker, Fundamentals of Physics (5th
ed.), Sec. 39-3
Tipler, Physics for Scientists and Engineers (3rd ed.), Sec.
35-2
In the photoelectric effect, a photon strikes a metal surface and an electron is subsequently ejected from the metal. An electron emitted from right at the surface has an energy equal to that of the photon less the energy needed to liberate the electron from the surface of the metal (this "surface binding energy" is called the work function W of the metal):
![]() (1)
(1)
where f is the frequency of the incident light, and h is Planck's constant (6.626 x 10⁻³⁴ J-s).
In this experiment, light will be broken into its component colors. Light of a single frequency will fall on the cathode of a vacuum tube. Some of the electrons ejected from the cathode will migrate to the vacuum tube anode, charging it negatively, leaving the cathode positively charged. The tube geometry is such that very little charge is able to leak from the anode back to the cathode, so the tube gets more and more charged as more photoelectrons are ejected. But in order for the photoelectrons to reach the anode, they must have enough kinetic energy to overcome the repulsion of the negative charges already on the anode.
The work-energy theorem states that the net work done on a body equals the change in its kinetic energy. The work done on the electrons (of charge -e) as they move to the anode from the cathode is eV, where V is the potential difference between anode and cathode, and e is the magnitude of the charge on the electron. Electrons will continue to accumulate on the anode if eV is less than the kinetic energy of the fastest photoelectrons. When the tube is fully charged, no more electrons can reach the anode; at this point the potential difference is equal to the stopping voltage,
![]() (2)
(2)
Thus a graph of stopping voltage vs. Frequency should be a straight line of slope h/e.
One of the central features of the photoelectric effect is that it is the frequency of the light, rather than its intensity, that governs ejection of electrons from the metal. There are electrons ejected even at low light intensity if the frequency of the light is high enough; if the frequency of the light is too low, no electrons will be ejected, even if the intensity is quite high. This is quite different from classically expected behavior, and is the essential evidence for the existence of the photon (Einstein, 1905).
 Laboratory
Safety: The source of light for this experiment is a high-intensity
mercury lamp. Mercury lamps emit some light in the ultraviolet (UV) part
of the spectrum. UV light causes damage to the skin and is thought to be
responsible for some skin cancers, so one must take precautions to avoid
any unnecessary exposure to UV. Do not look directly at the light coming
from the mercury lamp, and be sure that the light from the lamp enters
the room only through the slits provided.
Laboratory
Safety: The source of light for this experiment is a high-intensity
mercury lamp. Mercury lamps emit some light in the ultraviolet (UV) part
of the spectrum. UV light causes damage to the skin and is thought to be
responsible for some skin cancers, so one must take precautions to avoid
any unnecessary exposure to UV. Do not look directly at the light coming
from the mercury lamp, and be sure that the light from the lamp enters
the room only through the slits provided.
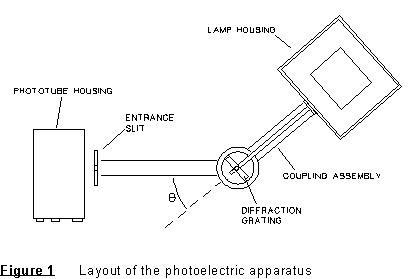
Apparatus Notes: The experimental apparatus includes the mercury light source, grating and lens, connecting hardware and photoelectric head. These are shown in Figure 1.
 In addition,
there are three items which magnetically attach to the reflective mask
in front of the photoelectric head; a green filter, a yellow filter, and
a variable density filter. The green filter is used for the green line,
the yellow filter is used for the yellow line, and the variable density
filter (which changes the amount of light coming in, but not its color
or frequency) is used to vary the light intensity in order to study the
effect of light intensity on the stopping voltage.
In addition,
there are three items which magnetically attach to the reflective mask
in front of the photoelectric head; a green filter, a yellow filter, and
a variable density filter. The green filter is used for the green line,
the yellow filter is used for the yellow line, and the variable density
filter (which changes the amount of light coming in, but not its color
or frequency) is used to vary the light intensity in order to study the
effect of light intensity on the stopping voltage.
Preliminary: First, see that the mercury lamp is turned on, and that it has had a few minutes to come to full intensity. The apparatus should be already set up, with slits in place for a narrow beam of light to exit on either side of the lamp. Each station should have a lens and holographic grating in place, and a 'photoelectric head' in place, mounted so it can rotate on the table top. See Figure 1.
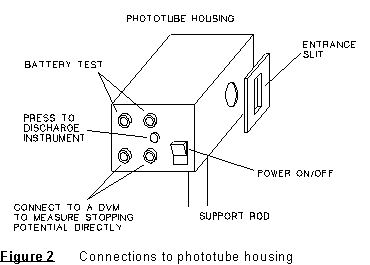
When you are ready to take measurements, turn the photoelectric head on, and connect it to a digital voltmeter, which should be on the 10V or 20V scale. Set up the apparatus with one color of light falling on the opening in the white reflective mask on the photoelectric head. By moving the cylindrical collar (light shield) behind the reflective mask, you can see if the light also falls on the opening of the phototube, as it should. There is a setscrew on the collar below the 'head' which permits rotating the head to permit the light coming through the opening in the mask to also fall on the opening of the phototube. Once you have the head oriented properly when you begin the lab, the setscrew should be tightened snugly so that the head will not rotate during the rest of the experiment. If you have questions about the setup, ask your lab instructor.
The five main 'lines' or colors you will work with have these wavelengths:
365 nm, 405 nm(violet), 436 nm(blue-violet), 546 nm(green) and 578 nm (yellow).
[The 365 nm line is in the ultraviolet and can't be observed directly;
however it causes a fluorescence on the screen which is visible.]
Frequency can be calculated from ![]() .
For each line, use the neutral density filter to determine the stopping
voltage at full intensity, as well as the four other intensities (80%,
60%, 40%, and 20%) provided. Make a table of each wavelength (color), and
the voltage at each of the intensities. When you examine the green line,
use the green filter in addition to the neutral density filter. Likewise,
use the yellow filter for the yellow line. The holographic grating gives
a stronger set of colors to one side than the other. Use the side with
the greater intensity, using only colors in first order for this part of
the experiment.
.
For each line, use the neutral density filter to determine the stopping
voltage at full intensity, as well as the four other intensities (80%,
60%, 40%, and 20%) provided. Make a table of each wavelength (color), and
the voltage at each of the intensities. When you examine the green line,
use the green filter in addition to the neutral density filter. Likewise,
use the yellow filter for the yellow line. The holographic grating gives
a stronger set of colors to one side than the other. Use the side with
the greater intensity, using only colors in first order for this part of
the experiment.
The light from the mercury source is split into its component wavelengths by a holographic grating according to the diffraction equation,
![]() (3)
(3)
where d is the grating spacing, ![]() is the wavelength, and n is the order of interference.
is the wavelength, and n is the order of interference.
You must take data involving both colors and angles to determine the spacing of the grating. Take enough data to get a fairly precise value of d.
(1) Graph frequency vs. 'stopping' voltage for the five main colors which you measured. Fit this data to a straight line and determine the value of the ratio of h/e. Provide a reasonable estimate of the uncertainty in your determination of h/e.
(2) What is the lowest frequency of light which could eject photoelectrons from this phototube? What would the wavelength of this light be (specify in nm)? Be sure your answer is supported by some calculation and discussion.
(3) What is the work function W of the phototube? Give your answer in both joules, and electron-volts (eV). [1 eV = 1.602 x 10⁻¹⁹ joules].
(4) Determine the spacing of the grating (in nm) which spreads out the light into its different colors. It will be necessary for you to measure some angles, along with colors to do this. Estimate the error in this value by making several determinations, then obtaining the average and standard error.
(5) For each of the five main colors seen on the reflective mask, determine how the stopping voltage is affected by the intensity of the light. Discuss your results.
Chapter 6 -- Other Experiments -- The Hydrogen Spectrum (Balmer Series)
last revision 3/96