Cheap Solar Projector Telescope
Note: This page is NOT finished,
but you can get
the general idea of what I’ve done from it now.
Last updated 6/22/04.
If you want to teach your kids a few
things about astronomy or
optics during the day without spending a lot of money, then this web
page is
for you.
I've enjoyed teaching my kids the names of a few constellations, and
setting up
a telescope for them occasionally, but if you've tried this you know
it's hard
to do without keeping them up late in the summer, or freezing them to
death in
the winter. I was looking for something to do with them
during the day,
and I thought of looking at sunspots, eclipses, and the like.
There are
only a few ways to view the solar disk safely, and most are either kind
of
expensive or very low quality. What I've come up with seems
inexpensive
and of at least moderate quality. Here are the methods of
solar
observation I could think of:
- Direct viewing with a filter
- This would be very inexpensive, but I discussed it with a guy at a telescope store, and he said "You really don't want to teach your 3 year old to look at the sun, even through a filter" and that killed it. I decided I didn't really want to use anything that involved even looking toward the sun.
- Solar filter for my telescope
- Not too expensive, but looking through the telescope at the sun without a filter will blind you in a fraction of a second. So, it doesn't pass the "don't teach them to look at the sun" test.
- Solar projection through my telescope
- Not too expensive, but has the potential to heat the eyepiece. Some of my eyepieces cost $200, so this seemed like a bad idea, too.
- Pin hole projection
- I tried this a few times with solar eclipses, but I've never gotten decent results, maybe I'm just not doing it right, but I think it just doesn't work very well.
- A Sunspotter projection telescope
- This is a really beautiful product that is as safe as can be (no looking toward the sun) and makes a lot of sense. If you have money but not time, this is what I'd get. On the other hand, it runs about $300, and that's a bit much for this project, so I thought, what if built something myself?
- A Solarscope projection telescope
- This is another solar projection scope I found about after I built mine, much cheaper than the Sunspotter (not as nice, though). At around $60, it’s in the range I was considering, but I still think it was more fun to build my own, and cheaper, and I think the Solarscope has slightly more potential for unsafe use than my design.
What I built was a very simple
projection telescope that
works well enough to see sunspots, only cost about $20, and was easy
enough to
assemble in one evening. I was so pleased with the result, I
thought I
should share it with others, hence this web page. Time for
the disclaimer:
SAFETY DISCLAIMER: Looking at the sun can cause
blindness.
Looking at the sun through a telescope can cause blindness almost
instantly. Anything you do with this design that burns a hole
in anything
at all, including your eye, is not my fault. The whole point
of this
design is to prevent anyone from looking through the telescope at the
sun, or
even toward the sun.
Several different optics professors told me "you can build a
telescope
out of just about any two lenses." So, I thought I'd give
that
theory a test and ordered a set of lenses from Edmund Scientifics (item
number
30404-14). Since they were out of stock last time I
checked, these
guys seem to have
the same thing. I
also ordered a couple
of the Edmund books on telescopes and optics which were inexpensive,
but only
moderately helpful. I did get some good ideas from them
though, as you'll
see. These lenses are 50mm diameter (about 2 in.) and there
are three
positive (convex) and three negative (concave) lenses. When
you're
building a telescope there are two basic approaches: two
positive lenses,
or a positive and a negative. The objective lens (the one
that goes
toward what you're looking at) is the one with the longer focal length
(which
is a "weaker" lens) and the eyepiece lens (the one you put your eye
up to) is the one with the shorter focal length (which is the
"stronger" lens).
If you want to build a telescope to look through with your eye
(obviously not
for solar viewing unless you have a filter), the equations are really
simple.
You need to space the lenses as far apart as the sum of their focal
lengths
(even if one is negative), and the magnification is just the ratio of
the focal
lengths
(![]() ).
These formulas seem to display well in Internet
Explorer, but not in Netscape. Sorry
about that.
).
These formulas seem to display well in Internet
Explorer, but not in Netscape. Sorry
about that.
You can ignore the sign on the
magnification. If you use two
positive lenses, it's called an "astronomical telescope" design and
it has an inverted image. If you use a positive objective
lens and a
negative eyepiece lens, it's called a "Galilean telescope" design,
and it has an upright image. With a negative focal length,
the lens
spacing is shorter, and the field of view is narrower. I
chose a Galilean
design because I wanted the whole thing to be shorter, and the sun
isn't very
wide. Inverted image or not isn't very important, since
nothing in space
seems upside down when you look at it. I'll get into the math
more later in case you
want to modify my design, but this is
about all I knew when I started.
I needed two tubes that would slide inside each other (you know,
"telescoping!"). It turns out telescoping cardboard mailing
tubes work really well for this. I got mine at a university
bookstore,
but I think most office supply stores carry them, too.
Amazingly, I
couldn’t find any on the web except in quantities of 25, like
this,
but I got mine for about $3, it was a 3” x 25” tube
with metal ends, and you
can telescope it to about 40” or so.
I
pried the metal ends off with an old bottle opener.
It’s hard to saw a straight cut on these, so
avoid that if you can. I
think the only
real disadvantage of cardboard is that sliding them seems to make dust
on the
optics, but I can live with that.
It
wasn’t really necessary to cut the mailing tube at all
(although I did
initially, of course), since it came in 3 pieces, roughly the lengths I
needed.
To get the lengths for my design, I just experimented with the lenses and a yardstick to see what would work. This was rather tedious, and I spent a lot of time later working on understanding the lens equations to be able to predict the behavior I wanted. I’ll give more detail about that below. Note one thing I learned was that the lens spacings are different if you focus on a light bulb on the ceiling than if you focus on the sun (the ceiling isn’t nearly far enough away to act like “infinity”).
The oatmeal canister idea came from the Edmund telescope book. I put a piece of white paper on the bottom (don’t glue it down, it gets dirty easily, and that makes “spots” on the sun that aren’t sunspots. I used a piece of black foamcore board to make a stiff mount between the oatmeal canister and the mailing tube end. Whenever I needed a circle cut out on the foamcore, I just drew a circle around the tube I wanted to match and then cut a little around the circle depending on whether I wanted a bigger or smaller hole. With no more precision than that, it’s amazing how well the thing worked out. If I were doing the oatmeal canister again, I might use the lid end for the screen (so it could be removed easily) and cut the bottom out and do the foam core on that end. I say this because the plastic rim didn’t hold to the epoxy well (that’s the part that broke) and although I have now epoxied over the edge of the plastic to get a better hold, it might work better this way. The downside of making the screen removable, is that now you could more easily look down the tube into the sun (AND LOSE YOUR EYESIGHT), which defeats the whole purpose. The upside is that you could replace the screen more easily if it got dirty.
A key element in the speed and success of this project: 5 Minute Epoxy. This made it possible to just put the thing together, hold it for a minute and then glue the next piece, which made it practical to build the whole thing in one night. It hardened faster than I could make the next chunk of foamcore. I’ve gone to hotglue on the lenses so I can (theoretically, anyway) take them back out and remount them later or reuse them, but I don’t think it’s strong enough for the main joint, which I’ve already broken once. The first version of lens mounts was done with epoxy, trying to keep the lenses untouched, so I made two outer discs to hold the lens inside, and an inner disk to attach to the end of the tube, and to glue the two outer disks to. If I did this again, I would just make one disk with a hole smaller than the lens, and hotglue the lens to it. The hotglue will come off the glass easily if you need to try again (I think), and there’s less chance of misaligning the lenses if they’re glued to a flat surface. After I decided to use all three negative lenses for the eyepiece, I did a very different mount and hotglue, but I’ll deal with that later.
Parts List:
Design Math:
To do this design with different lenses, you just need a couple of things: an equation to relate the screen distance and the lens spacing to the lens focal lengths, and an equation to tell how big the solar image will be. All these equations will be approximate, since most by-hand designs are done that way.
The simple part is figuring the solar
image size. The sun
is approximately one half degree in
diameter. If you
magnify the image by 3x,
you get an angle of 1.5 degrees. If
you convert this to radians, you can get
the arclength which is
approximately the image
diameter using ![]() . So, the image size
should come out to about
. So, the image size
should come out to about![]() where solardiameter
is
the diameter of the solar image projected, mag is the magnification of
your
telescope (see equation above), and d
is the distance from the eyepiece lens to the projection screen. The 0.5 degrees is the
angular size of the
sun, and the pi/180 is the degrees to radians conversion.
where solardiameter
is
the diameter of the solar image projected, mag is the magnification of
your
telescope (see equation above), and d
is the distance from the eyepiece lens to the projection screen. The 0.5 degrees is the
angular size of the
sun, and the pi/180 is the degrees to radians conversion.
The more involved equation isn’t that hard to derive, but it takes some diagrams to completely explain. I’ll give the summary here and hope to put the diagrams in later. See the hyperphysics links at the bottom of the page for some nice generic diagrams explaining the lens equations I used. Assuming the objective lens is lens 1 and the eyepiece is lens 2 (negative focal length in this design), I get this relationship:

The lens spacing is just the distance between the two lenses, and the screen distance is the same as d above.
One more thing: in the latest version, I stacked all three negative lenses together to form a “stronger” negative eyepiece lens. When lenses are touching, you can add their reciprocal focal lengths (approximately).

For my design, I just did a spreadsheet with these relationships to figure out what range of tube lengths I could use.
Some assembly photos (soon).
Some Venus transit photos:

Unfortunately, I still
haven’t got a good system for
producing well-focused images on the camera (there is a very narrow
depth of
field, and it’s hard to see the focus quality in the tiny
viewfinder). I am
working on a method of getting highly
focused images, but in this one you can see the shadow of Venus very
near 3rd
contact. This was
taken in
Pictures:
If you open most of these pictures in a separate window (I’ll add the links later, I hope), they are higher resolution than what you’ll get on this page.
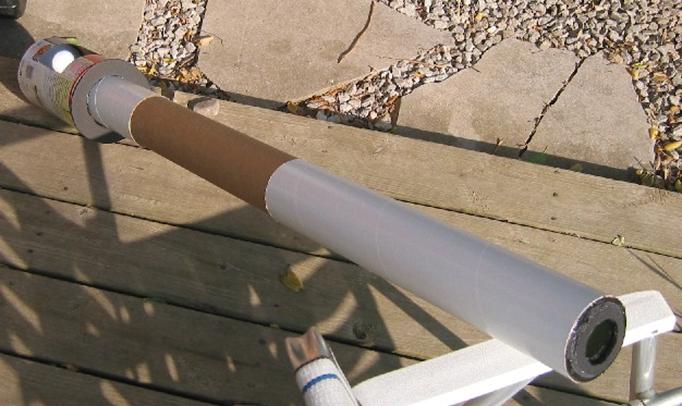
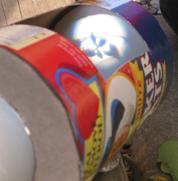
The telescope in operation. If this looks precarious to you, well, let’s just say, I’ve fixed it since “the fall.”
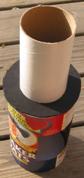
The screen with opening, and a foam-core mount for the mailing tube end.
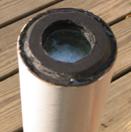
The objective lens mount.
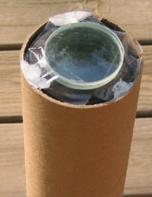
The eyepiece lens mount, with the other two negative lenses taped on for experimentation.
What happens when there’s a tree between you and the sun. You can tell the difference between the focus distance for the tree and the sun.
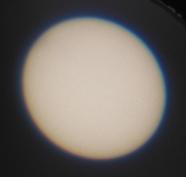
A focused image of the sun. There is a blue fringe and you can’t see the sunspot in this image, although I could see it with my eyes. I haven’t learned how to get the contrast and focus on the digital camera set just right yet. It’s not quite round, because you can’t take a dead-on image from this device.
Here’s the
Some links about telescopes and mailing tubes. I’ll fix them up better later.
http://hyperphysics.phy-astr.gsu.edu/hbase/geoopt/lenscon.html#c1
http://hyperphysics.phy-astr.gsu.edu/hbase/geoopt/image.html#c1
http://hyperphysics.phy-astr.gsu.edu/hbase/geoopt/image3.html#c1
http://web.missouri.edu/~wwwepic/Telesc_Projector-MaryDiane_.pdf (lesson plans for mailing
tube telescope)
http://www.nasa.gov/audience/foreducators/informal/features/F_Build_a_Telescope.html
http://galileo.rice.edu/lib/student_work/astronomy96/mtelescope.html
Copyright 2004 Wayne T. Padgett
Want to talk about it? Remove the (nospam) from my address and email me at Wayne.Padgett@(nospam)rose-hulman.edu. I’d love to hear that you’ve gotten something similar working.
|
|