CSSE 373—Formal Methods in Specification and Design
Alloy Lab
Purpose: Install Alloy and get some practice using the tools in an environment where help is available.
We’ll devote two class periods to working on this. I’m not sure that we’ll need that much time, but I want to make sure we start out well.
Subversion
-
Update your working copy of your Subversion repository. It should now include subdirectories for each homework, plus this Alloy Lab.
Getting Started with Alloy
-
Install the Alloy Analyzer.
-
Verify that your Alloy installation is working:
-
Choose File → Open Sample Models…. Navigate to examples → puzzles and open
farmer.als.
-
Read through the Alloy model for this classic logic puzzle. Note that sigs in Alloy are very similar to classes or structs. Once everyone has Alloy working, we’ll look at this model in a bit more detail.
-
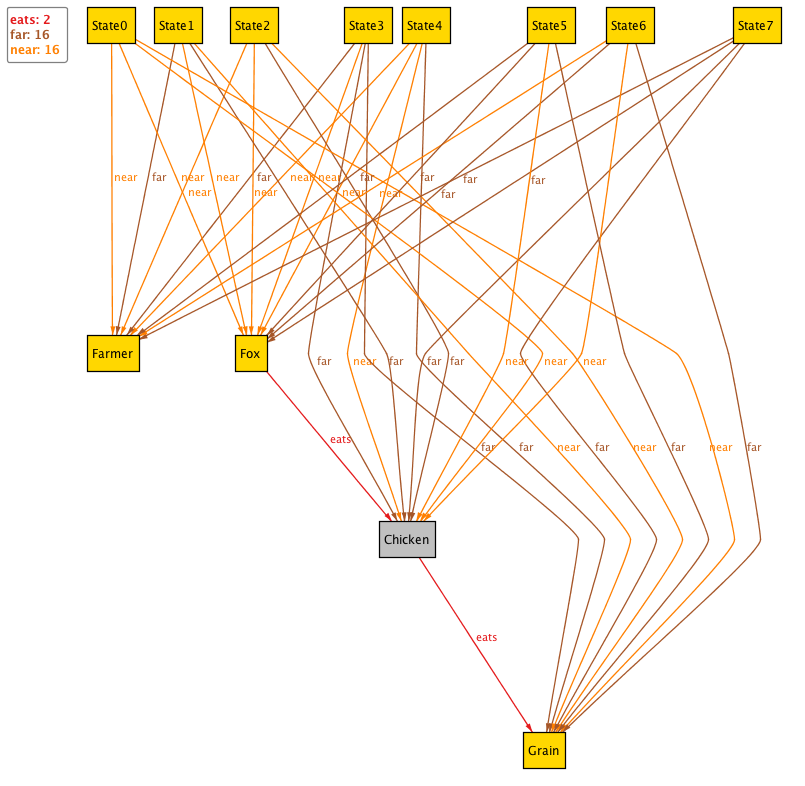
Click on the Execute button. Alloy should quickly perform an exhaustive search for a sequence of States where in the final State all Objects are on the far side of the river. You should get a picture like the one below. (If the picture doesn’t appear, click the Show button.)
-
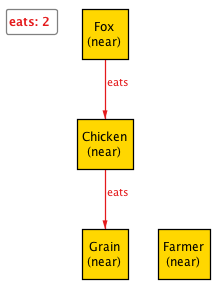
That’s a bit overwhelming, so we can narrow down to focus on one state at a time. In the Visualizer window, click on Projection: None. Then select State. You should now see just one state at a time. The drop-down box and arrows at the bottom let you move through the states. (The eats label here means “can eat if the farmer isn't there”, not “currently eating”.)
-
Move through the states and notice how the objects are labelled (near) and (far) to indicate which side of the river they are on. (Alloy generally tries to number the states in the natural order. This numbering algorithm is a bit wonky in Alloy 4.1.9, but seems to work for this example. We’ll look at examples where it’s wonky later.)
-
For the remainder of the lab you will be experimenting with Alloy and answering a series of questions. Create a file in your
AlloyLab subdirectory to record your answers. This can be a plain text file, or a Word file, or whatever format works for you. Whatever format you choose, you must be able to generate a pdf file of your answers at the end of the lab.
-
Back in the main Alloy window, notice that Alloy displays some statistics on its solving process.
-
How much time did Alloy take to solve the puzzle? (Sum the number of milliseconds shown for each operation.)
-
Choose Options → Sat Solver → MiniSat and run the solver again. How much time did it take this time?
-
At the top of the statistics display, what does the warning say?
-
The Quick Guide documentation for Alloy is available from the Help menu. Open the documentation and use it to answer the following:
-
What modes does Alloy offer for visualizing its results?
-
How many built-in utility modules does Alloy provide?
-
When performing analyses on Alloy models, does the Execute button run all analyses in a model, or just the most recent one?
-
What are two things that affect the speed of analysis in Alloy?
Using Alloy
For the rest of this lab, you’ll work through the examples in Chapter 2 of the text, answering some questions as you go.
The models for the examples are available from Open Sample Models…, so you could just open them from there. On the other hand, you’ll have to design your own models for homework and the project, so I want you to get experience creating models, making mistakes, and correcting them. Thus, I strongly recommend that you follow along with the book and type the models yourself, at least for the first several examples.
WARNING: Alloy 4 has a few syntax changes from Alloy 3 as used in the text. For this lab, the important change is that argument and parameter lists use square brackets rather than parentheses. So, for example, the show predicate at the bottom of page 6 should be entered like
pred show [] {}
run show for 3 but 1 Book
rather than with the parentheses after show as in the text.
-
Create a new Alloy model. Save it as
addressBook1.als to your AlloyLab subdirectory.
-
Enter the code on page 6 of the text, from
module tour/addressBook1 through run show for 3 but 1 Book. Don’t forget to use square brackets instead of parentheses for the (empty) argument list of show.
-
Answer these questions, referring to the text as necessary:
-
What is the name of the field in the Book signature?
-
How many fields do the
Name and Addr signatures have?
-
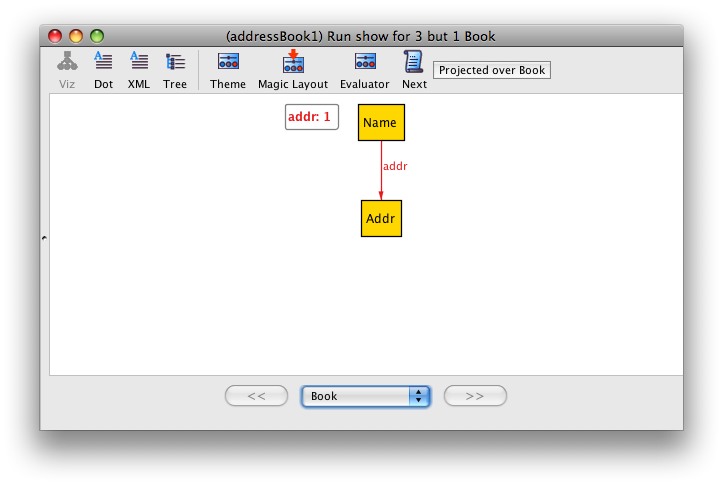
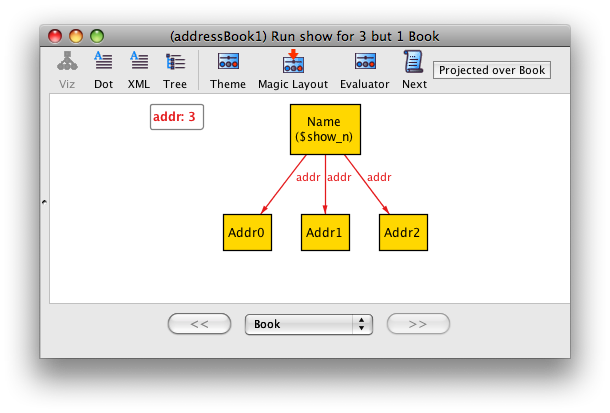
Execute the model and show the results in the Visualizer. Change the projection to ”Project over Book“. You should see something like the image below. How many Books are available by the drop down menu at the bottom of the window?
-
In the visualizer, use the Next button to step through the models. This shows all the unique configurations, or instances, that Alloy found which satisfy the constraints given by the model and the run command.
In the run command,
-
what does the
3 signify?
-
what does the
1 Book signify?
-
Change the
show predicate as shown on page 7. Re-execute the run command and explore the instances generated.
-
What’s different about these versus the original, empty
show predicate?
-
What does the constraint
#b.addr > 1 mean?
-
Change the show predicate as shown on page 8 to look for a single name that maps to more than one address.
Here’s how I read the new constraint some n : Name | #n.(b.addr) > 1.
This says that we want some Name, call it n, such that the condition after the vertical bar holds. Starting inside the parentheses, the condition says first take a book b and get its addr field. That field maps from Names to Addresses. Applying this mapping to the name n, yields the set of addresses to which n maps. Finally, the rest of the condition says that the size of this set is greater than one.
When you execute the run command you should get a message like No instance found. Predicate may be inconsistent. in the statistics window. What single keyword in the signature for Book causes the show predicate to have no matches?
-
Remove the lone keyword from the signature of Book and execute the run command again. You should get something like the image below. Use Next to step through the various instances.
-
Add the lone keyword back to the signature of Book:
sig Book {
	addr: Name -> lone Addr
}
-
Change the last constraint of the
show predicate to #Name.(b.addr) > 1 as shown on the bottom of page 8. What’s the difference in meaning when we replace some name n with Name?
-
Take a break. Enjoy a cool beverage. You’ve earned it.
-
Wasn’t that refreshing? No? Perhaps you didn’t do it correctly.
Modeling Dynamic Systems
Section 2.2 of the text deals with adding operations to our address book model. You’ve seen the basics of the tool and visualizer now, so the rest of the lab will be less detailed.
-
Add the following add predicate to your model:
pred add [b, b': Book, n: Name, a: Addr] {
	b != b'
	b'.addr = b.addr + n->a
}
This is like the one on the bottom of page 9, but we’ve added a constraint to ensure the b and b' are different.
This predicate takes four parameters. (You remembered to use square brackets, right?) Both b and b' (say "b prime") are Books, n is a Name and a is an Address.
The whole b and b' idea is common in formal specifications. b represents the state of some Book before adding to it. b' represents the same Book after adding to it. The constraint inside the predicate is not assignment. It just relates the before and after states of the book. We’ll see in a minute that you can swap the expressions on the two sides of the equals sign and get the same result.
-
Add the command run add for 3 but 2 Book as shown on the middle of page 10. Save your file.
Click on the Execute menu.
-
How many Run items are there now?
-
What are they?
-
Execute the run command for add. In the visualizer, making sure you’re still Projected over Book, step through the two states. Try turning off the Projection. You should see something like this:
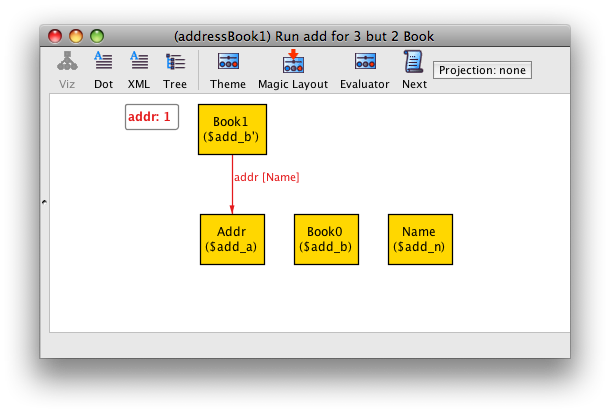
What do you suppose is the meaning of the items in parentheses within each block?
Use the Next button to explore some of the other instances. See if you can figure out where the add operation is happening in each. Notice what happens when you mouse over parts of the figures.
-
Change the add predicate so the second constraint is
b.addr + n->a = b'.addr.
-
How is this different from the original constraint?
-
Why doesn’t this change affect the result?
-
Experiment with the
showAdd predicate and run command on the bottom of page 10. Don’t forget to use square brackets for the arguments to the add predicate in the second line.
-
Add the
del predicate and lookup function from page 12.
-
What does the “
: set Addr” mean in the declaration of the lookup function?
-
What do you suppose is the difference between a predicate and a function in Alloy?
-
Now we’re going to start finding bugs in our design (or our understanding of our design). Add the assertion from the top of page 13 and the subsequent check command.
This assertion deals with three book states: one before the operations, one after an add but before a delete, and one after adding then deleting.
Execute the new check command. (Remember to use the execute menu so you get the new command.) What counterexample does Alloy discover?
-
Modify the assertion as shown on the bottom of page 13. In English, what does this change do?
-
Finally, let’s look at the effect of the scope on the analyzer run time.
-
How long does it take to check
delUndoesAdd for a scope of size 3?
-
Crank up the scope to 10 addresss and 10 names as shown on page 14. Now how long does the check take?
-
That’s it for the required steps in this lab. I encourage you to work through the rest of the examples in chapter 2 on your own. You can use File → Open Sample Models… to save some typing.
When you get to Fig 2.17 (using addressBook3c.als, if you aren’t typing anymore), you’ll probably find that Book_2 and Book_3 are swapped. This is the ordering problem with Alloy 4.1.9 mentioned earlier. The numbers don’t match the logical ordering of states used internally by Alloy. To see the internal ordering, you can switch the visualizer to Tree view and look at sig BookOrder/Ord:
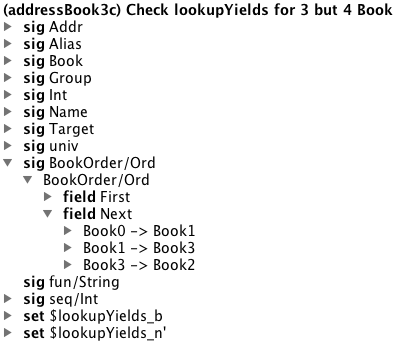
Notice the order is Book0, Book1, Book3, Book2. If you project over Books and look at the images in the 0,1,3,2 order, you should be able to see how the assertion is violated.
Turn-in
Generate a pdf file of your answers to the questions. Add the pdf file, plus the Alloy model that you created from chapter 2, to SVN and commit your working copy.