Instructions, Part 1 - Checkout the Project
- Open Eclipse.
- Switch to the SVN Repository Exploring perspective.
- Here's how: Choose Window ~ Open Perspective ~ Other...,
then choose SVN Repository Exploring.
- You'll get an SVN Repositories view where your Package Explorer usually lives.
You should see your individual repository.
Expand it and you should see a JavaEyes folder.
- You should also see the HelloWorld folder
that you put into the repository yourself previously.
- Your instructor put this initial version of JavaEyes
into your individual repository.
- If you don't see your individual repository and JavaEyes,
get help now.
- Checkout your JavaEyes project.
- Here's how: Right-click on JavaEyes and select
Checkout....
Accept all defaults as you go through the Checkout dialogs.
- If Eclipse asks if you want to go to the Team Synchronizing perspective,
reply No.
- Return to the Java perspective to begin reading/modifying the code.
Consider:
Checking out JavaEyes changed your Package Explorer view.
(It may also have changed your Problems view,
since JavaEyes intentionally has some errors.)
How is your Package Explorer view different
than it was before you checked out the JavaEyes project?
Consider:
What perspective do you use for checking out a project from a repository?
Consider:
What perspective do you use for reading/modifying the code of a project?
Consider:
What menu do you use to change perspectives?
Instructions, Part 2 - Fix the compile-time errors
- Examine the Problems tab.
You should see two errors and four warnings.
- Fix the errors (but leave the warnings for now) by:
- Double-click on an error in the Problems tab
to go to the line where the error occurs.
- Note that the error is highlighted.
- Hover over the red circle-X
on the left margin, next to the line number.
- Click the red circle-X
to bring up the Quick Fix drop-down menu.
- Select and then apply an appropriate Quick Fix.
Note how Eclipse previews the effect of the selected Quick Fix
before you apply it.
Before continuing, make sure that you understand how to use Quick Fix.
Ask questions as needed.
- Run the program (the green arrow is handy)
and play around with some of its features.
Instructions, Part 3 - Read the code
- Answer the following questions as you browse the code.
- Note and use both the Package Explorer window
on the left-hand-side of Eclipse
and the Outline window on the right-hand-side of Eclipse.
Consider:
How many classes are in the JavaEyes project?
Consider:
How many methods does the Eye class in JavaEyes have?
Consider:
How many constructors does the Eye class have?
Consider:
How many fields does the Eye class have?
Before continuing, make sure that you understand how to use the Package Explorer
and Outline windows.
Ask questions as needed.
- Hover over a variable anywhere in the code.
Note the help that pops up.
- Hover over a reference to a class anywhere in the code.
Note the help that pops up.
- Hover over a reference to a method anywhere in the code.
Note the help that pops up.
Instructions, Part 4 - Code-completion and compile-on-the-fly
- Find the code that declares the default eye (not eyeball) color.
Change it to another (non-white) color of your choice.
- Do so by backspacing over white and noting the options available.
Before continuing, make sure that you understand
how to use Eclipse's code completion.
Ask questions as needed.
- Eclipse compiles on-the-fly.
This means it can find compile-time errors automatically for you and suggest fixes.
Consider:
In Eclipse, do you need a separate “build” or “compile” step
before you run?
Instructions, Part 5 - Fix a run-time error
- Run JavaEyes until you see a red run-time
error message in the Console window.
- It takes a while, and you have to move the eyeballs around a lot.
Ask if you don't see red.
- Decipher the red run-time
error message in the Console window. (You'll need to scroll up.) Ask questions as needed.
Consider:
What Exception (error) occurred, according to the error message?
Consider:
At what statement did the Exception (error) occur, according to the error message?
- Fix the source of the run-time error
(while keeping the rest of the program intact).
Before continuing,
make sure that you understand how, when an exception (run-time error) occurs,
to find what exception occurred and at what statement it occurred.
Ask questions as needed.
Instructions, Part 6 - Fix documentation errors
- The Problems tab shows four warnings,
all resulting from missing Javadoc comments.
Use Quick Fix on each warning to add a Javadoc comment.
Then fill in each Javadoc comment appropriately,
using the Javadoc comments elsewhere in the code as examples.
- Make sure that the warning messages go away before continuing.
- Make sure that your comments are accurate and appropriate.
- Note that the doc folder in Package Explorer is empty.
Generate the html Javadoc now by:
- Select Project ~ Generate Javadoc....
- In the Javadoc Generation dialog that appears:
- Confirm that the Javadoc command
is C:\Program Files\Java\jdk1.6.0_14\bin\javadoc.exe.
(If not, press Configure and browse to find it.)
- Check the JavaEyes checkbox if it is not already selected.
- Select the Protected radio button.
- Select the Use standard doclet radio button
and make sure the Destination
is the doc subfolder of your JavaEyes folder.
(If not, browse to find it.)
- Press Next to continue.
- In the Configure Javadoc arguments for standard doclet dialog that appears,
check the rt.jar checkbox. (You may have to scroll.)
- Press Finish
- If you get a message asking Do you want to update the Javadoc location...,
respond Yes.
- Note that the doc folder in Package Explorer now has lots of files.
Click on index.html to examine the generated Javadoc.
Pretty cool, yes?
- Try right-clicking on index.html
and select Open with ~ Web Browser.
In the browser that opens,
browse the JavaEyes classes and some of the non-JavaEyes classes that are linked.
Before continuing,
make sure that you understand the structure of the information
in a Javadoc-generated page for a class.
Ask questions as needed.
- If you prefer the internal browser (i.e. inside Eclipse),
right-click on index.html (inside Eclipse) again and select Open with ~ Internal Web Browser.
Eclipse will remember whatever you did most recently, internal or external.
- Confirm that the browser shows the comments that you typed.
Confirm that those comments are accurate and appropriate -- if not,
fix the comments and regenerate the Javadoc.
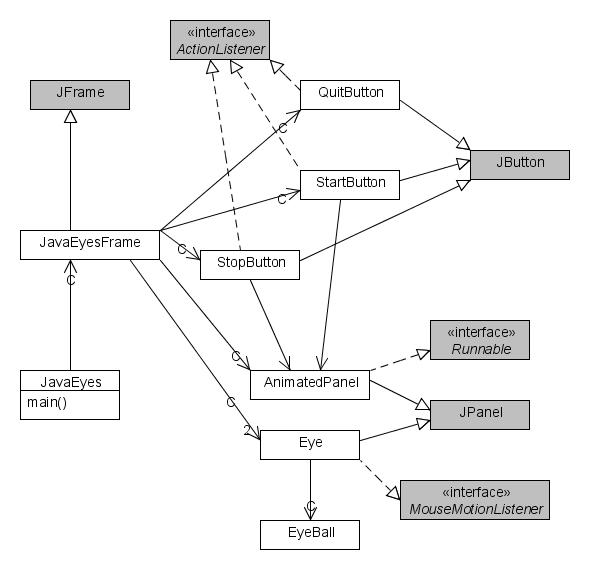
Instructions, Part 7 - Add eyes (the has-a relationship)
- Recall the
UML class diagram for JavaEyes.
Consider:
Suppose that you want to add a 3rd eye that behaves just like the other two eyes.
What change(s) to the design are necessary?
That is, what change(s) must you make to the UML class diagram
to reflect the addition of a 3rd eye?
- Implement the design change(s) per the previous item -- that is,
add a 3rd eye that is just like the other two eyes.
- Add a 4th eye that is just like the other two eyes,
except that the 4th eye's color is green
and the 4th eyes' eyeball has color orange.
- Hint: this is almost as easy as adding the 3rd eye.
This part of JavaEyes showed you that you can implement different kinds of Eyes
by using fields -- in this case, fields for the Eye's color
and the color of the Eye's Eyeball.
You construct different kinds of Eyes by using the two-parameter constructor
that lets you specify these colors when the Eye is constructed.
Consider:
Suppose that you want to implement square Eyes
(i.e., Eyes that are drawn as squares instead of as ovals).
How could you use this differentiation-by-using-fields pattern
to do so?
(Just write your answer in the Angel Report; you do not need to implement this,
although it is not hard to do so.)
Instructions, Part 8 - Add eyes (the is-a relationship)
- Another way to implement different kinds of Eyes
is to implement subclasses that extend Eye.
This approach is better than the field-approach of the previous section
whenever the new Eyes are different enough from the standard Eyes
to deserve their own subclasses.
Implement a new class called SquareEye
that extends Eye
and overrides the Eye's paintComponent method.
A SquareEye should be (as the name suggests) drawn as a square
instead of an oval.
(Its eyeball remains round.)
Construct and add at least one instance of a SquareEye to demonstrate that your SquareEye works correctly.
Consider:
When you extend a class,
how do you make the subclass behave differently than the superclass?
- Extra credit, just for grins:
If you wish (and ONLY if you wish),
make the eyeball of a SquareEye alternate between two points as the mouse is moved, or continually roll around clockwise,
or do something else cool.
Instructions, Part 9 - Many eyes (using a loop)
- Using a loop,
add 99 more Eyes (all of which behave the same way).
Far out!
- Hint: you don't need an array if you are careful.
Instructions, Part 10 - Turn in your work (i.e., commit your project)
- Examine the Tasks tab at the bottom of Eclipse
and complete any TODO items for this project.
- Do you see how you can put your own TODO comments
and have Eclipse keep track of your own remaining tasks?
- In all your code throughout this term, type Control-Shift-F before you turn it in
(and occasionally throughout your coding).
- This formats your program to match a standard coding style for Java,
fixing indentation problems and the like.
- Do this step to each file that you modified just before you commit any work;
formatting errors in your code are unacceptable,
given how easy it is to fix them.
- If the Control-Shift-F modifies the file, you'll need to save it explicitly (or rerun the program to force a save).
- Commit your JavaEyes project to the repository from which you checked it out, by:
- Right-click on JavaEyes in Package Explorer.
- Select Team ~ Commit.
- In the Commit dialog that appears, make sure that all your JavaEyes files are checked.
- In the Commit dialog, type a meaningful (or at least fun) log comment.