CSSE 220: Object-Oriented Software Development
SwingDemo, Part 2

You will do this using pair programming. Remember that:

Goals

This exercise will let you:
  • Explore how to create a basic Graphical User Interface (GUI).
  • Learn to avoid some of the pitfalls in GUI creation.
  • Investigate some useful types of JComponents like JLabel, JPanel and JButton.
  • Discover how to use a LayoutManager to add components to containers.
  • See how Event-Driven Programming works and become adept at it.
  • Review from Swing Demo, Part 1 how to draw on a JComponent using a Graphics2D object .
  • Improve your skill at using an Application Programming Interface (API), in particular, the Swing API.

Grading rubric

Each of 16 stages is worth 5 points.

Because this is an exploratory exercise, no documentation is required.

  • By all means, feel free to write helpful comments + javadoc to yourself!
  • You should use good style, as usual, and your grade may be reduced if you do not do so.
    • Control-shift-F is helpful to format the file you are working on!
    • The code that you turn in should have no warning messages (and of course, no error messages).

Overview

You will implement this project in stages, testing at each stage to see if the project works correctly through that stage.

Implement the project

Implement according to the following Iterative Enhancement Plan (IEP):

Stage 0. Read the specification

Here is a (purposefully incomplete) specification of this project:

  • A SwingDemo has a SwingDemoPanel that holds:
    • A JLabel
    • A JPanel with some Shape's drawn on it
    • Some JButton's grouped on a JPanel
    • Some other Swing component of your own choosing
  • The JButton's respond to button-events and interact with the other components in various ways.
  • The mouse responds to mouse-events and interacts with components in various ways.
  • A LayoutManager controls the placement of the components on the JPanel's.
  • A SwingDemoApplication class constructs and displays a SwingDemoPanel in a SwingDemoFrame that extends JFrame
  • A SwingDemoApplet class constructs and displays a SwingDemoPanel in a JApplet.
    • Hence, the project can start as either an Application (through main) or an Applet (through init).

The SwingDemo2 project when finished - a JLabel, JComponent, JPanels and JButtons are displayed

Project after all stages are implemented

Stage 1. A tiny JFrame appears

  1. Open Eclipse.
  2. From your team repository (csse220-201030-swingdemo2-teamXX, where XX is your team number), checkout the Java project called SwingDemo2
    • SwingDemo2 starts out as a completely empty project.
  3. Inside the swingDemo2 package, create a new class called SwingDemoApplication with the usual main method.
  4. In main, construct a new SwingDemoFrame()
  5. Create a SwingDemoFrame class. (Use Quick Fix!) Make it extend JFrame.
    • As usual, use Quick Fix to insert the required import   statements.
  6. Create a no-parameter constructor in SwingDemoFrame that contains the following statements:
    
      this.setDefaultCloseOperation(JFrame.EXIT_ON_CLOSE);
      this.setTitle("Swing Demo");
    
    
  7. Back in main, apply the setVisible method to your constructed SwingDemoFrame, passing it true as its argument.
    • For example, your statements in main might be:
      
          JFrame swingingFrame = new SwingDemoFrame();
          swingingFrame.setVisible(true);
      
  8. Run your application, if you have not already done so.
    • It should display a tiny JFrame like this: Stage 1: Tiny frame appears The JFrame may be hard to find; look in the upper-left corner of your screen.
  9. You should commit your project to your individual repository at the end of this and EVERY stage.
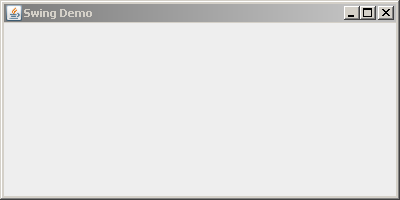
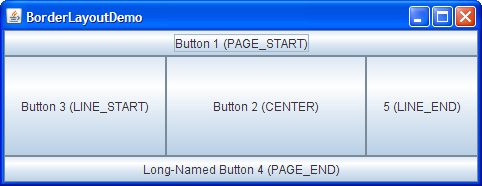
At the end of this stage, your project should display a tiny JFrame that looks like this:

Stage 1: Tiny frame appears

Test your understanding: Answer these questions (and all the “Test your understanding” questions you encounter in this exercise) aloud with your partner, but be quick to discuss them with your instructor, a student assistant or a classmate if you are unsure of your answer.

  • What goes wrong if we fail to specify that the default close operation of the SwingDemoFrame is EXIT_ON_CLOSE?
  • Why are we constructing a class that extends JFrame instead of just constructing a JFrame and telling the constructed JFrame what to do?
    • The latter works and is not unreasonable here, but in a larger project with the JFrame doing more ...
  • Why do you construct a SwingDemoFrame in main but declare it to be a JFrame? Answer:
    • Declaring it to be a SwingDemoFrame works, but it only needs to be a JFrame.
    • Declaring it to be the more general JFrame means that subsequent code won't have to change it someone later changes the implementation of the JFrame from a SwingDemoFrame to some other type of JFrame.
    • Bottom line: it makes our code more reusable.
    • We'll discuss this concept in more depth when we discuss polymorphism in the context of inheritance.
  • Pitfall: Putting the call to setVisible in the SwingDemoFrame's constructor instead of putting it in main (as in the above) can sometimes cause the JFrame to NOT become visible.
    • Can you guess why? Hint: suppose that the constructor has, after the call to setVisible, some code that takes a long time to run. Then ...
  • What questions do you have about the statements you wrote in this stage or the process so far?

Stage 2. The JFrame is 400 x 200

  1. Switch drivers (now, and at the beginning of every stage)!
  2. In your SwingDemoFrame's constructor, set the size of the SwingDemoFrame to be 400 pixels wide by 200 tall.
    • As usual, type this followed by a dot and see what shows up under the set's , so that Eclipse does the typing for you and you don't have to memorize the names of all the relevant methods.
  3. Run your application, if you have not already done so. It should display a JFrame that looks like the picture to the right.
  4. Commit your work
Stage 2: A 400 by 200 frame appears

Test your understanding:

  • Do you see how you can use Eclipse's auto-suggestions to figure out “on the fly” what Swing method will do what you want?
  • What questions do you have about the statements you wrote in this stage or the process so far?

Stage 3. A cyan JPanel appears on the JFrame

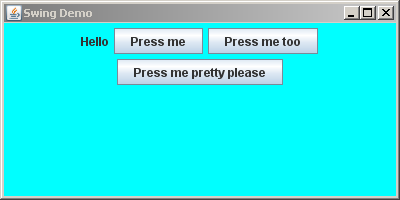
So now you have a JFrame. Rather than adding all our components directly onto the JFrame, we will:

  • add a single JPanel onto the JFrame, and
  • add all other components to the JPanel.
Here's why:
  • You can't add a JFrame to a JApplet, but you can add a JPanel to a JApplet.
  • So if you decide to change the program from an Application (that runs standalone) to an Applet (that runs in a browser), all you need to do is add the same JPanel you use for the Application to the JApplet!
    • You'll actually do this in the last step of this exercise.

So let's add a JPanel to your JFrame. To get a component to appear, you need to construct it, then add it to the component on which it is to appear. So:

  1. In SwingDemoFrame's constructor, construct a new SwingDemoPanel.
  2. Having constructed a new SwingDemoPanel, Eclipse will offer (via Quick Fix) to create a SwingDemoPanel class. Use Quick Fix to create the class.
  3. Make the SwingDemoPanel class extend JPanel.
  4. Create a no-parameter constructor for your SwingDemoPanel class. In it, have your SwingDemoPanel set its background color to cyan.
    • Hint: As usual, to figure out how to set the background color, type this followed by a dot and examine your options. One will look very appropriate!
    • As usual, to see your standard color options, type Color followed by a dot and examine your options. One will look very appropriate!
  5. Back in SwingDemoFrame's constructor, add your constructed SwingDemoPanel to the SwingDemoFrame
    • For example, your statements might be:
      
          JPanel swingingPanel = new SwingDemoPanel();
          this.add(swingingPanel);
      
      
    • Pitfall: Constructing a component but forgetting to add it to the enclosing container.
  6. Run your application, if you have not already done so. It should display a JFrame with a cyan JPanel on it that looks like the picture to the right.
Stage 3: A cyan JPanel appears on the JFrame

Test your understanding:

  • Do you see how you can use Eclipse's Quick Fix to write a stub of a new class after you have written a statement that constructs a new instance of the class?
    • Similarly, you can use Eclipse's Quick Fix to write a stub of a new method after you have written a statement that calls the method.
  • Do you understand what add does?
  • Do you understand why we add a JPanel to the JFrame and will add other components to the JPanel, rather than directly adding them to the JFrame?
  • What questions do you have about the statements you wrote in this stage or the process so far?

Stage 4. A label that says "Hello" appears, along with buttons that say "Press me", "Press me too" and "Press me pretty please"

As we just saw, to get a component to appear, you need to construct it, then add it to the component on which it is to appear. So:

  1. In SwingDemoPanel's constructor, first set its LayoutManager to be a new FlowLayout, like this:
    
        this.setLayout(new FlowLayout());
    
    
    • FlowLayout causes components that are added to “flow” left to right and top to bottom, just as text flows on a page in English. FlowLayout is the default for a JPanel, but the above makes it explicit, which will be helpful when we change to another layout later in the exercise.
  2. In SwingDemoPanel's constructor, construct and add a new JLabel whose text is "Hello".
  3. Also construct and add a new JButton whose text is "Press me".
  4. Also construct and add a new JButton whose text is "Press me too".
  5. Also construct and add a new JButton whose text is "Press me pretty please".
  6. If you haven't already done so, run the application and note the effect of FlowLayout, as described earlier in this stage.

    • To see the effect of FlowLayout, try resizing the application after it starts, especially making it very narrow and then very wide.
Stage 4: A JLabel and JButtons appear on the cyan JPanel

Test your understanding:

  • Do you understand what add does? What kinds of things have an add method? What kinds of things can the add method take as its argument?
  • Do you understand how FlowLayout lays out components?
  • Do you understand why using a LayoutManager like FlowLayout is a good idea? (What is the alternative, and why is it worse?)
  • Do the buttons do anything yet when pressed? (Try them!)
  • Your buttons should be local variables, NOT fields. Why?
    • In fact, your buttons don't have to be declared at all, so far at least! That is, you could have statements like:
      
          this.add(new JButton("Press me"));
      
      
  • What questions do you have about the statements you wrote in this stage or the process so far?

Stage 5. A red JPanel appears between the label and the buttons

  1. To your SwingDemoPanel, construct and add a new ColoredPanel, where ColoredPanel extends JPanel.
    • As before, type the constructor call first and then use Quick Fix to let Eclipse type a stub of the ColoredPanel class for you.
  2. The panel should set its background color to red.
  3. Run your application. At this point, the ColoredPanel will be tiny, as shown in the first of the three pictures to the right.
    • If you haven't already done so, make your application look like the first picture to the right, with the red panel AFTER the label and BEFORE the buttons.
      • FlowLayout will place them in the order they are added, so you just need to add the ColoredPanel in the right place.
  4. Now let's make the ColoredPanel bigger: In its constructor, the ColoredPanel should set its preferred size to 200 x 200, using its setPreferredSize method.
    • Pitfall: Using the setSize method on a JPanel. Use setSize only for JFrame's.
    • The setPreferredSize method needs a Dimension as its argument.
      • So construct a new one, giving it 200 and 200 as its arguments, like this:
        
            this.setPreferredSize(new Dimension(200, 200));
        
        
    • Pitfall: Trying to use two integers as the arguments to setPreferredSize; it requires a Dimension, although setSize (for JFrame's) allows either form.
  5. If you haven't already done so, run your application and verify that it looks like the middle of the three pictures to the right.
    • Also resize the window by hand, confirming that the buttons are not lost; they are just below the original 400 x 200 size.
  6. Sometimes you want to set the size of the enclosing JFrame and let its components fit within that size as best they can; that is how your project is organized at this point.

    But other times you want the JFrame to have whatever size it needs to hold its components — no bigger and no smaller. To do that, in your SwingDemoFrame's constructor, ask the SwingDemoFrame to pack , like this:

    
        this.pack();
    
    
    • Doing a pack causes the Window (here, a JFrame) to be sized to fit the preferred size and layouts of its subcomponents (here, just the SwingDemoPanel, which itself contains the JLabel, ColoredPanel and JButton's).
    • Do the pack in the SwingDemoFrame's constructor AFTER adding the SwingDemoPanel to the SwingDemoFrame.
    • Comment-out the setSize in the SwingDemoFrame's constructor, since pack is doing the sizing now.
  7. Run the program at this point. Notice that the application finally shows up with the “right” size, as shown in the third of the three pictures to the right.
  8. So far we are using FlowLayout throughout — components “flow” from left to right and from the top to the bottom to fit in their container as best they can.
    • Try running the application and resizing the window by hand into a narrow column, to see the components flow from top to bottom.

Tiny red JPanel appears between the label and buttons

200 x 200 red JPanel appears between the label and buttons, but cut off

200 x 200 red JPanel appears fully between the label and buttons

Test your understanding:

  • What determines the order in which objects appear in a component whose LayoutManager is a FlowLayout?
  • Which do you use for sizing a JPanel (or any other JComponent) — setSize or setPreferredSize?
  • When do you use setSize and when do you use pack? What is the difference between these two approaches?
  • Why did we have you put the statements that set the ColoredPanel's size and color in the ColoredPanel's constructor instead of putting them in the enclosing SwingDemoPanel's constructor? (The latter works, but ...)
    • The reason relates to the principle of encapsulation — “hiding the internal representation of an object from view outside of the object's definition” (see Wikipedia on encapsulation if you want to learn more about this).
  • What questions do you have about the statements you wrote in this stage or the process so far?

Stage 6. The label stays on top, the red panel in the center, and the buttons on the bottom, even when the frame is resized

  1. OK, in this stage we want to lay out the frame's components so that the label stays on top, the red panel is in the center, and the buttons stays on the bottom, even when the frame is resized. (See picture to the right.)

    To accomplish this, do all the following:

    1. Change the SwingDemoPanel's LayoutManager from a new FlowLayout() to a new BorderLayout().
      • The statement that sets the layout must PRECEDE the add statements.
    2. Bundle the three buttons into a new JPanel, as follows:
      • Construct a new JPanel.
      • Add each of the three buttons to this new JPanel instead of to the SwingDemoPanel.
      • Add the new JPanel to the SwingDemoPanel.
    3. Change the add statements that add the label, ColoredPanel, and new JPanel to the SwingDemoPanel to statements like this:
      
         this.add(BLAH, BorderLayout.PAGE_START);
         this.add(BLAH, BorderLayout.CENTER);
         this.add(BLAH, BorderLayout.PAGE_END);
      
      
      • See the picture to the right showing how BorderLayout works. Ask questions as needed.
  2. Play around with resizing the application, to see the effect of the SwingDemoPanel's BorderLayout combined with the interior JPanel's default FlowLayout.

Project converted to BorderLayout BorderLayout template

Test your understanding:

  • Do you see how to organize your project into components within components (within components...), and how to implement that organization?
  • Do you understand how BorderLayout lays out components? (Try resizing the application if you haven't.)
  • Note that BorderLayout changes the size of your ColoredPanel when the frame is resized, where FlowLayout retained the ColoredPanel's preferred size as long as it could fit in the frame.
    • That's just the way that BorderLayout works. If it is not what you want, then you don't want BorderLayout.
    • Try setting the preferred size of your JPanel for the buttons and seeing what happens when you resize the application after it starts.
  • Skim this Visual Guide to Layout Managers, just noting the eight or so pictures it shows of layout managers.
    • Revisit this page when you want to do a more complicated layout in your projects.
  • What questions do you have about the statements you wrote in this stage or the process so far?

Stage 7. Clicking the first button causes the background color of the ColoredPanel to toggle between red and green

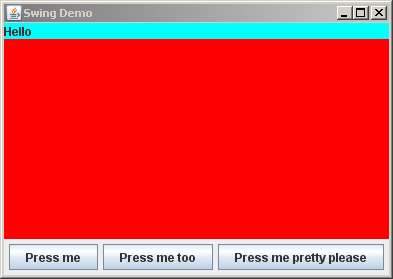
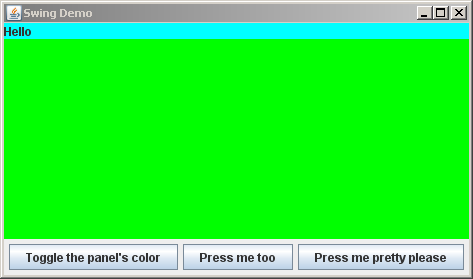
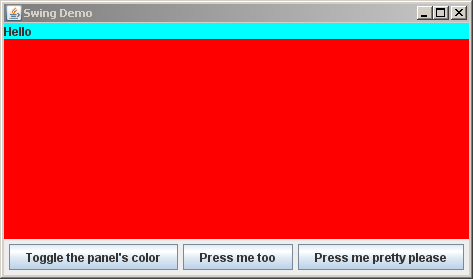
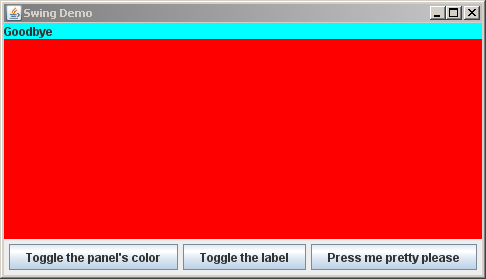
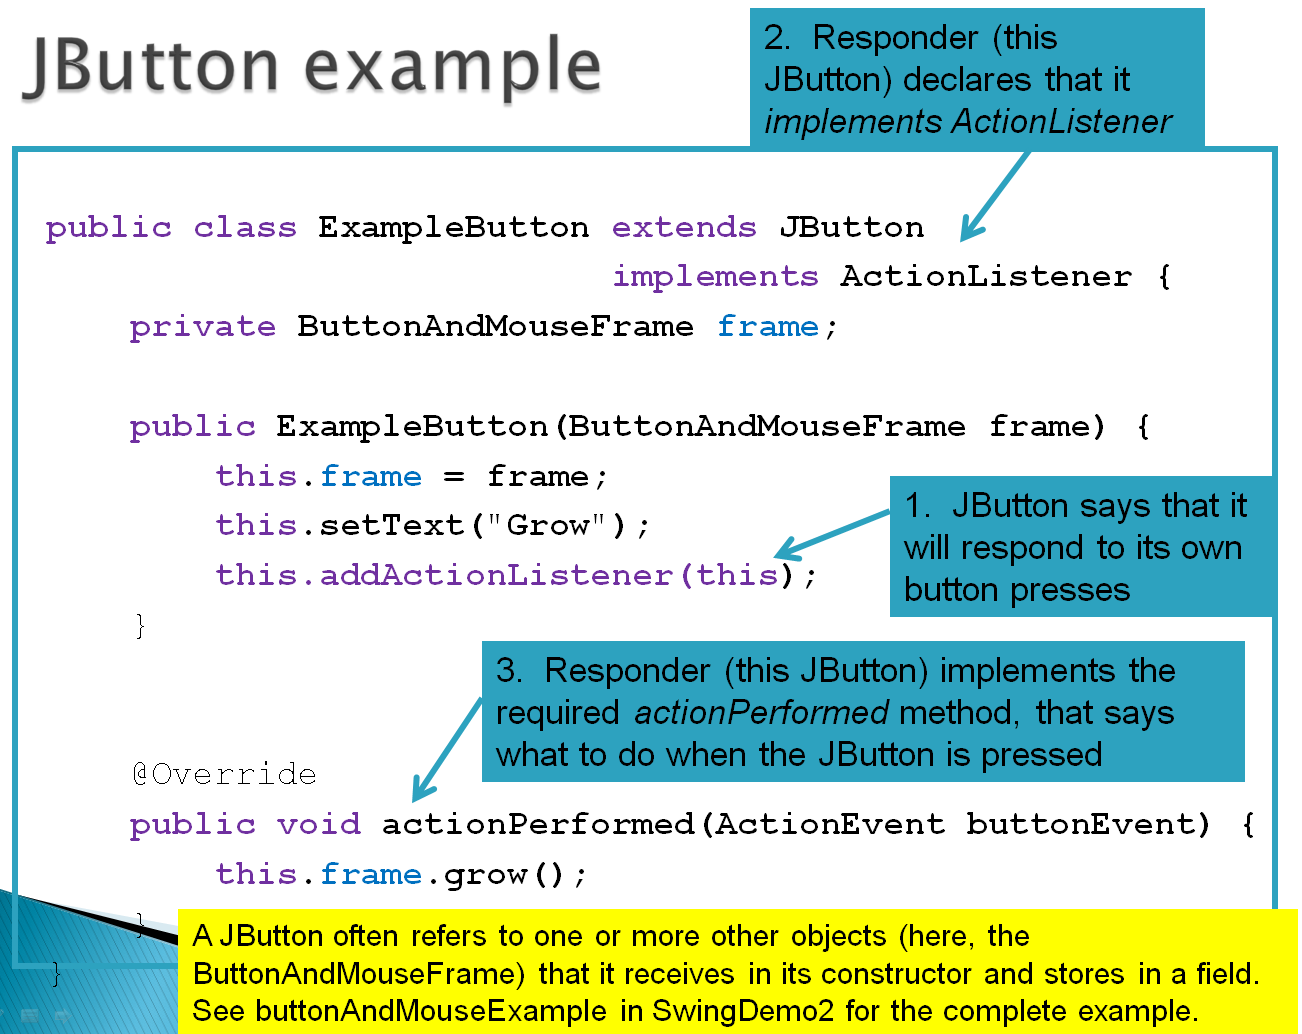
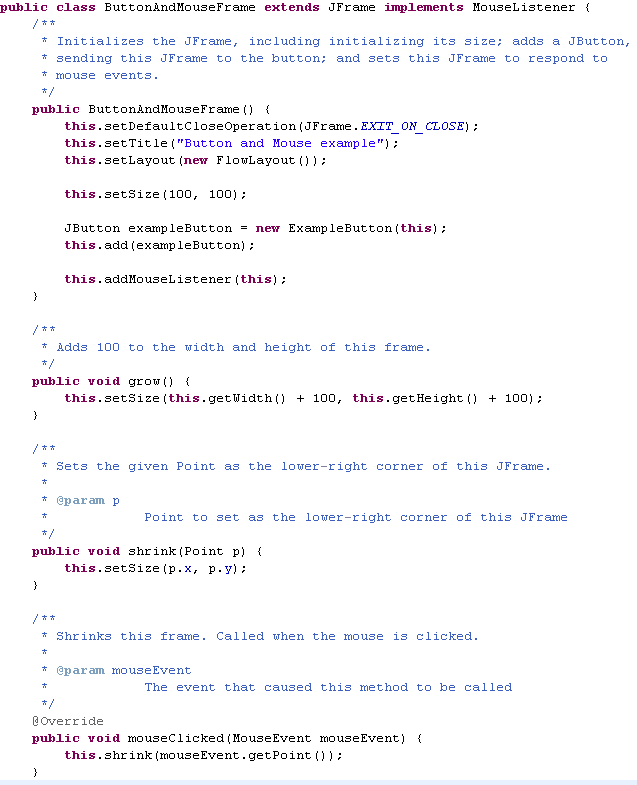
This stage is an example of event-driven programming — the operating system generates events (button presses, mouse clicks, timer alarm rings, etc) which your code handles.

A JButton responds to button-presses through a 3-step process:

  • The JButton says which object(s) will respond when the JButton is pressed.
    • A JButton usually responds to its own button-presses; if so, you would put a statement like the following in the JButton's constructor:
      
          this.addActionListener(this);
      
      
  • The responding object(s) implements ActionListener.
  • This means that there is an actionPerformed method that specifies what is to happen when the JButton is pressed.

Your SwingDemo2 project came with an example of a JButton that responds to button-presses. The example also demonstrates responding to mouse-clicks, which are similar. Here is the button example. Keep it in mind as you proceed as follows:

  1. Convert your "Press me" button to a class that extends JButton, instead of a JButton itself.
    • We usually choose names that end in "Button" for JButton classes, e.g. something like TogglePanelColorButton here.
  2. Give your new class a no-parameter constructor. In that constructor, change the button's text to be "Toggle the panel's color" instead of "Press me".
  3. Make the button respond to its own button-press. When pressed, it should ask the ColoredPanel to toggle its background color between red and green. To accomplish this:
    1. In the TogglePanelColorButton's constructor, have this button add itself as an ActionListener (per Example 2 above).
    2. Using Quick Fix (perhaps the LAST entry in a long list of Quick Fix options), have the TogglePanelColorButton implement ActionListener.
    3. In the actionPerformed method that Quick Fix wrote for you, make this TogglePanelColorButton's associated ColoredPanel toggle its color between red and green.
      • Perhaps you should implement a toggleColor method in your ColoredPanel class.
      • Since the button asks the ColoredPanel to do something, the button must “have” the ColoredPanel. The usual way to implement this is to pass the ColoredPanel to the button in the button's constructor.

You will probably have questions in doing the above; ask away (instructor, student assistants or classmates) — it's OK!

Red panel has toggled its background color to green
Green panel has toggled its background color to red

Test your understanding:

  • Do you see how to have listeners and responders, and how to relate them?
  • Do you see that if we want to follow the rule of thumb and have the button respond to its own button-press, then we must implement the button has-a ColoredPanel relationship?
  • Do you see the general approach for implementing has-a relationships among objects in a GUI?
  • What questions do you have about the statements you wrote in this stage or the process so far?

Stage 8. Clicking the second button causes the label to toggle between "Hello" and "Goodbye"

  1. Proceed much as you did in the previous stage, but implementing the second button this time. In particular:
    • Convert your "Press me too" button to a class that extends JButton, instead of a JButton itself.
    • Change the button's text to be "Toggle label" instead of "Press me too".
    • Make the button respond to its own button-press. When pressed, it should cause the label on the frame to toggle between “Hello” and “Goodbye”.
Frame has toggled the label on it to Goodbye Frame has toggled the label on it to Hello

Test your understanding:

  • Do you see the general pattern for responding to button-presses?
  • What questions do you have about the statements you wrote in this stage or the process so far?

Stage 9. A circle appears inside the red panel

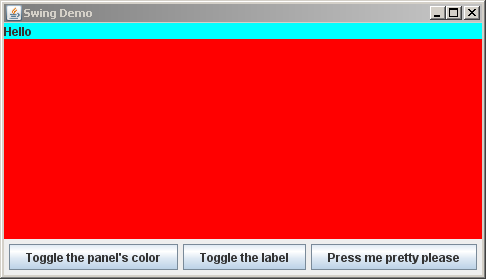
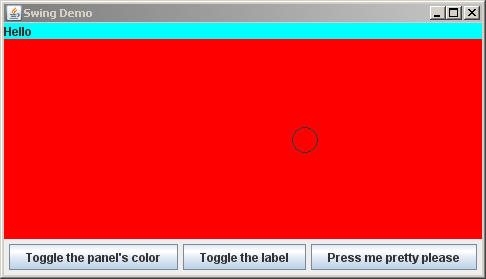
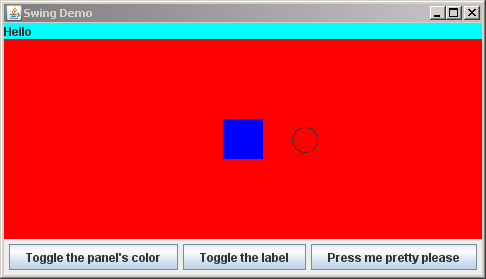
This stage will review what you learned in Swing Demo, Part 1 about painting (drawing) on a JComponent.

You paint on a JComponent (or, as here, on a JPanel) by overriding its paintComponent method. Proceed as follows:

  1. Override the paintComponent(Graphics) method that ColoredPanel inherits from JComponent, as follows:
    1. With the cursor in your ColoredPanel class, select:
      Source → Override/Implement Methods ...
      and check the paintComponent(Graphics) box.
    2. Note that Eclipse typed for you this stub:
      
          @Override
          protected void paintComponent(Graphics g) {
              super.paintComponent(g);
              // TODO Replace this auto-generated method stub by working code.
          }
      
      
      • Eclipse may have chosen its own name for the parameter. I have chosen g as the parameter name.
      • The first statement in paintComponent calls the superclass' paintComponent method, that is, JPanel's paintComponent method. Hence, we are augmenting what a JPanel's paintComponent does, rather than replacing what a JPanel's paintComponent does.
      • Pitfall: Omitting this call to the superclass' paintComponent. Nothing shows up when you make this hard-to-spot error.
      • Pitfall: Getting the signature of the overridden paintComponent wrong. Again, nothing shows up when you make this hard-to-spot error.
    3. Replace the TODO statement in the body of paintComponent with a statement that casts the Graphics object that we called g into what it really is: a Graphics2D object. That is, add the following statement:
      
              Graphics2D g2 = (Graphics2D) g;
      
      
      • All the drawing commands will use this more powerful Graphics2D object, not the original Graphics object.
    4. After the above statement, construct an Ellipse2D.Double that is a circle called (say) circle at any reasonable location with any reasonable size, something like this:
      
              Shape circle = new Ellipse2D.Double(200, 100, 25, 25);
      
      
      • Note that we can declare the circle using the interface type Shape, to make the subsequent code as reusable as possible.
    5. Finally, after the above statement, ask the graphics2 object to draw the circle, like this:
      
              g2.draw(circle);
      
      
    6. Run your application, if you have not already done so.
      • It should look like the picture to the right.
      • If it doesn't, get help now as needed.
A circle appears on the red panel

Stage 10. A blue, filled shape appears inside the red panel

  1. Fill (instead of draw) at least one other type of shape on the panel, with the color of that shape being BLUE.
    • To set the color, try a dot after graphics object and see what appears, as usual.
  2. Challenge (optional): how could you get your blue shape to show up in the middle of the panel, even when the application is resized?
Another shape (here, a filled blue rectangle) appears on the red panel

Test your understanding:

  • What class do you extend to draw on it?
    • Answer: usually JComponent, but here we extended JPanel (which is a subclass of JComponent). You can draw on either. JPanel generally draws its background color per what you set it to (it actually depends on the look and feel in force), while JComponent ignores whatever you set the background color to.
  • What method do you override and do the painting in?
  • What must you do in the first line of that method?
  • The Graphics object that paintComponent is given is in fact a Graphics2D object. What is the notation for casting the Graphics object called graphics into a Graphics2D object? Why do you need to cast it?
  • What class has a method for drawing Shape objects like Ellipse2D.Double and Rectangle?
  • What method of that class draws a Shape (like a Rectangle)? (Duh!) How about drawing a filled Shape? How does that method know what to draw/fill?
  • How do you make Shapes drawn or filled with a Color?
  • What questions do you have about the statements you wrote in this stage or the process so far?

Stage 11. Pressing the third button causes the circle to move 20 units left

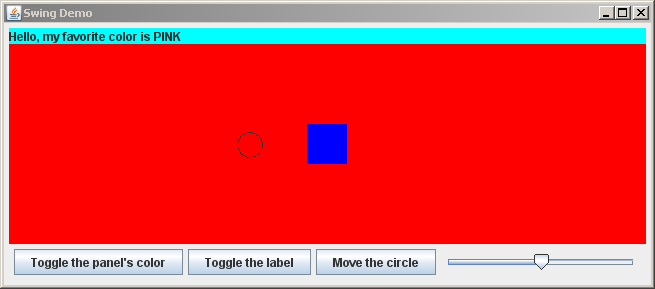
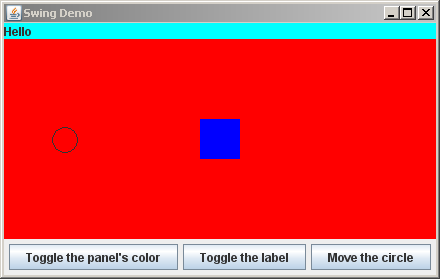
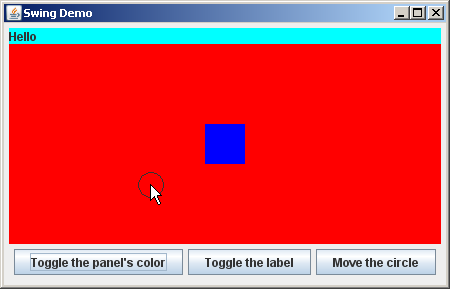
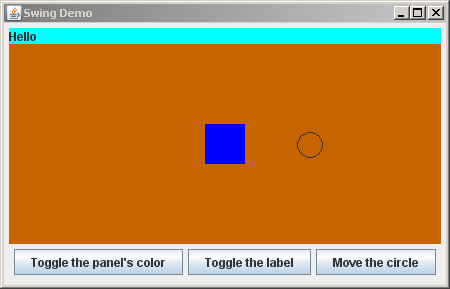
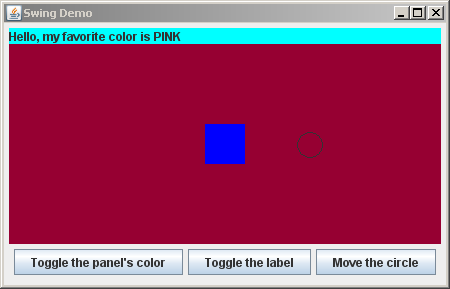
In this stage, you will implement a crude form of animation — repeatedly pressing the third button moves the circle.

  1. Proceed much as you did in the previous stages, but implementing the third button this time. In particular:
    • Convert your "Press me pretty please" button to a class that extends JButton, instead of a JButton itself.
    • Change the button's text to be "Move the circle" instead of "Press me pretty please".
    • Make the button respond to its own button-press. When pressed, the circle on the red/green panel should move 20 units left.
      • Note: When the button tells the panel to move its circle, the button must follow up by asking the panel to repaint itself.
        • Pitfall: Forgetting to ask the object to repaint. You can spot this error by minimizing-and-restoring the application, which forces a repaint; if the object is redrawn properly now (here, the circle is moved), then you know that you forgot to repaint or otherwise update the object.
      • You'll have to think hard about what the button's actionPerformed method should ask its ColoredPanel to do, to have the effect that when the ColoredPanel is repainted the circle is 20 units further left than it previously was. Not a trivial exercise!
  2. Challenge (optional): Make the circle return to the center of the panel when it goes offscreen.
Circle has moved left 60 units Circle has moved left 240 units

Test your understanding:

  • Do you see the general pattern for responding to button-presses?
  • Do you see what is involved when one object (here, the JButton for moving the circle) affects another object (here, its associated ColoredPanel)?
    • In particular, do you see the has-a relationship that is required, and how to implement it?
  • Do you see why you MUST have a field for the circle's x position in this stage?
  • What questions do you have about the statements you wrote in this stage or the process so far?

Stage 12. Clicking the mouse inside the red/green panel moves the circle to the mouse click

This stage is another example of event-driven programming — the operating system generates events (button presses, mouse clicks, timer alarm rings, etc) which your code handles.

A JComponent (e.g. a JPanel as here) responds to mouse events (clicks, presses and releases, enter and exit a window) through a 3-step process:

  • The JComponent in which the MouseEvent's will occur says which object(s) will respond when the MouseEvent occurs.
    • A JComponent usually responds to its own MouseEvent's; if so, you would put a statement like the following in the JComponent's constructor:
      
          this.addMouseListener(this);
      
      
  • The responding object(s) implements MouseListener.
  • This means that there is an mouseClicked method that specifies what is to happen when the mouse is clicked, along with four other methods for other mouse events.

Your SwingDemo2 project came with an example of a JButton that responds to button-presses. The example also demonstrates responding to mouse-clicks, which are similar. Here is the button example and the mouse example. Keep them (especially the mouse example) in mind as you proceed as follows:

  1. Make the ColoredPanel implement MouseListener.
  2. Make the ColoredPanel add itself as a MouseListener.
  3. One of the required methods when you implement a MouseListener is mouseClicked. Implement this method, making it change the circle's position to the mouse position (and do a repaint). You can leave the four other MouseListener methods in their do-nothing implementations.
Circle has moved to mouse

Test your understanding:

  • Do you see the general pattern for responding to mouse-presses? Do you see that it is very similar to the pattern for responding to button-presses?
  • What questions do you have about the statements you wrote in this stage or the process so far?

Stage 13. Display a pop-up message

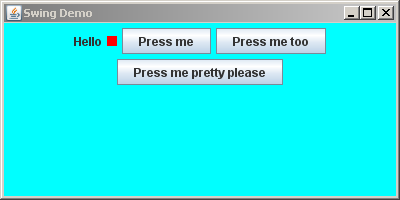
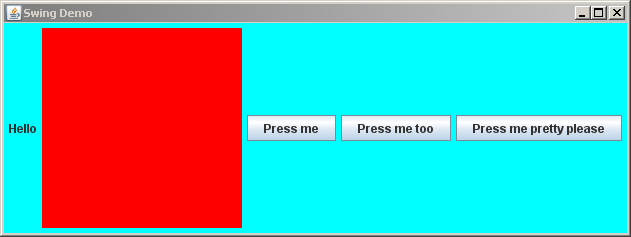
You have seen two ways to display data on the screen:

  • Add a Swing component, e.g. a JLabel, to a JFrame or JPanel.
  • Draw on a JPanel by overriding its paintComponent method.

Two other ways to display data on the screen are:

  • Print on the console by using System.out.println.
  • Display a pop-up message by using JOptionPane, as follows:
  1. First, in main, display a message on the console that says something clever, just for practice.
    • It doesn't need to be very clever -- full credit for any message!
  2. Now, again in main, display a pop-up message that says something else clever, by using a statement something like this:
    
        JOptionPane.showMessageDialog(null, "Hi");
    
    
    • The JOptionPane class has many useful methods, including some for getting input from the user via pop-up dialogs, per the next stage.
A clever message displayed on the console A clever pop-up message

Test your understanding:

  • Do you see how to display messages in a pop-up dialog?
  • What questions do you have about the statements you wrote in this stage or the process so far?

Stage 14. Getting input from the Console and via a Pop-up Dialog

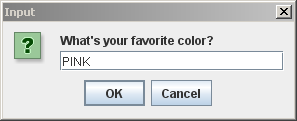
You have seen that you can get input from the user via button-presses and mouse clicks. Two other ways to get input from the user are:

  • From the Console, by using a Scanner object.
  • From a pop-up dialog (akin to the pop-up message you did in the previous stage).
This stage explores both of these.
  1. Let's first explore getting input from the Console by using a Scanner object. To that end, near the beginning of SwingDemoPanel's constructor

    1. Construct a new Scanner, giving it the input console System.in.
      • That is, put a statement like:
        
            Scanner input = new Scanner(System.in);
        
        
    2. Use your Scanner object to get an int from the user.
      • Hint: As usual, try typing a dot after your scanner variable and see what's available to get the next integer that the user enters.
      • Display a “prompt” on the console to prompt the user to enter this number (and in the next step, two more numbers), as indicated in the pictures to the right.

    3. Repeat the previous step twice more, so that you get three int values from the user.
    4. Finally, arrange for your SwingDemoPanel to use these three int values to construct a Color to which the ColoredPanel sets its own color.
      • So the ColoredPanel initially will be whatever color the user requests, instead of always being red. (Once you start pressing the button to toggle the colors, you can still toggle between red and green; we won't require you to remember the color the user requested.)
      • The user should input numbers between 0 and 255, inclusive, for the amount of red, green, and blue, respectively, in the Color for the ColoredPanel. You don't have to enforce this restriction; it is just what the user should do.
  2. Now let's try getting input by using a pop-up dialog. To that end, still in the SwingDemoPanel's constructor:
    1. Display an input dialog that asks the user for her favorite color, by using the JOptionPane.showInputDialog method something like this:
      
          JOptionPane.showInputDialog("What's your favorite color");
      
      
    2. Store the returned value from the call to showInputDialog as a String; that returned value is whatever the user entered in the dialog box.
    3. Finally, add to the label that appears on the SwingDemoPanel to indicate the user's favorite color (e.g., “Hello, my favorite color is PINK”), as shown in the pictures to the right.
      • You just display the message; you do NOT have to change anything's color to the favorite color.
Input from the console of three numbers for the amount of red, green and blue Frame with components, colored panel has the color that the user chose Pop-up question asking what is your favorite color Frame with components, including label indicating user's favorite color

Test your understanding:

  • Do you see how to use a Scanner to get console input from the user? Could you easily learn how to use the Scanner to get inputs of type double or other types?
  • Do you see how to get String input in a pop-up dialog? What class would you investigate to find out how to get more sophisticated input from pop-up dialogs?
  • What questions do you have about the statements you wrote in this stage or the process so far?

Stage 15. Something else novel appears on the frame

  1. Skim this wonderful Visual Guide to Swing Components, just noting the wide variety of components that you can use in Swing.
  2. Add some Swing component (other than JButton or JPanel) from the above link to the right-hand-side of your frame.
    • Your new component does NOT have to do anything; it just has to be plain that it is not a JButton or JPanel.
A JSlider has been added to the right-hand-side of the frame

Stage 16. The project runs as an Applet as well as an Application

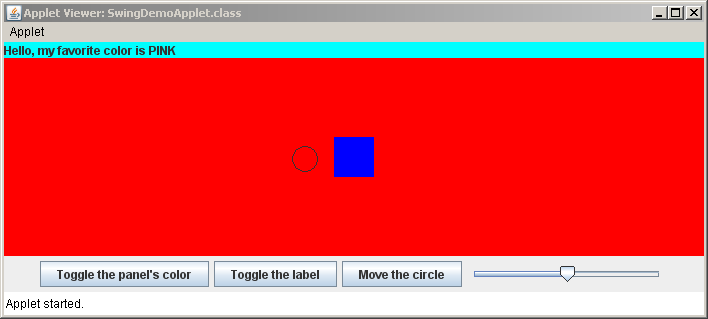
An Applet is a Java program that is meant to be displayed in a browser's window. As you will see, it is VERY easy to make an Application (which you have written) into an Applet.

  • The key is to do all the GUI work in a JComponent (here, a JPanel), because you can add a JComponent to a JFrame (as in an Application) or to a JApplet (as in an Applet).
  1. Create a SwingDemoApplet class and make it look like this:
    
    public class SwingDemoApplet extends JApplet {
        @Override
        public void init() {
            super.init();
    
            this.setSize(700, 250);
            this.add(new SwingDemoPanel());
        }
    }
    
    
  2. Select the SwingDemoApplet class and press the Run button in Eclipse. (Or right-click on SwingDemoApplet and select Run As ... Java Applet.) You should see your project run in the built-in Applet Viewer. It will look almost identical to the Application (just the title changes, and the sizing is a bit different).
  3. (Optional, don't submit this part.) If you wanted to run it from a webpage, you'd need to get rid of anything that interacts with the console (step 14).
Final version, but as an Applet

In your forthcoming projects you will want to learn more about Swing. The following tutorials from the Java Tutorials are excellent:

Test your understanding:

You should now be comfortable with the following:
  • Displaying a JFrame.
  • Adding components like JPanel, JButton and JLabel to JFrame's and JPanel's.
  • The basic idea and use of a LayoutManager.
  • Responding to button-presses and mouse-clicks.
  • Implementing simple has-a relationships.
  • Displaying information to the user by:
    • Adding components to a JFrame or JPanel
    • Drawing on a JPanel
    • Printing on the console
    • Displaying a pop-up message
  • Getting information from the user by:
    • Using a Scanner for console input
    • Displaying a pop-up input dialog
    • Button presses and mouse clicks

If you have questions about ANY of the above, bring your questions to class!

Stage 17. Turn in your work

Review the rubric above.

Commit your project to your individual repository when you are done.

BOTH partners must understand the entire project. Alert your instructor if that is not the case for your partnership.