CSSE 220: Object-Oriented Software Development
Faces

You will do this exercise by yourself, but be quick to ask questions of your instructor, student assistants and classmates as desired.

Goals

This exercise will let you:

  • Practice developing a UML class diagram

  • Combine and apply concepts that you have practiced in previous exercies, especially how to:

    • Implement a class
      • Fields, constructors, methods.
      • Constructing objects by using the new keyword
      • Referencing instance fields and methods by using the this keyword
    • Create a basic GUI (Graphics User Interface) and draw on it.
      • The JFrame and JComponent classes; the add method of the former and the paintComponent method of the latter.
    • Investigate and apply an API (Application Programming Interface). In particular, the use of these classes:
      • JFrame and JComponent
      • Graphics2D
      • Ellipse2D.Double and Arc2D.Double
      • Color
  • See how a project can easily be implemented as both an Application and as an Applet

Grading rubric

  • Stage 1 works as specified: 5 points.
  • Stage 2 works as specified: 5 points.
  • `
  • Stage 3 works as specified: 10 points.
  • Stage 4 works as specified: 10 points.
  • Stage 5 works as specified: 10 points.
  • Stage 6 works as specified: 10 points.
Total possible: 50 points.

Do this project using documented stubs throughout.

  • Your score may be reduced by as much as 40% for each stage that is missing documentation.

Use good style throughout.

  • Your score may be reduced by as much as 40% for each stage that uses poor style.
  • Exception: it is OK to have magic numbers in your code that tests drawing Faces.
  • Control-shift-F is helpful to format the file you are working on!

For any points deducted, the grader will put a CONSIDER tag saying how many points were deducted and why.

“Earn back” may be available for this assignment; ask your instructor.

  • Students: “earn back” is a privilege — don't abuse it. Put forth your “good faith” effort on the project and reserve earn-back for errors that you did not anticipate.

Here is a link to the General Instructions for Grading Programs.

Overview

You will implement this project in stages, testing at each stage to see if the project works correctly through that stage.

  1. Read the stages of the iterative enhancement plan (i.e., the subheadings of the next section).

Implement the project

Implement according to the following Iterative Enhancement Plan (IEP):

Stage 0. Read the specification, then design the project using a UML class diagram

Here is a specification of this project:

  • A Face class allows users of the class to specify:
    • The position on the screen of the center of the Face
    • The diameter of the Face
    • The angle at which the Face is oriented
    • The colors of the Face, its outline, its eyes, and the outline of its mouth
  • A Face can draw, translate and rotate itself
    • More precisely, it will implement the Faceable interface

  • A FacesComponent class tests the drawing of Face objects
    • By producing something like the picture to the right

  • A FacesViewer class constructs and displays a FacesComponent
  • Optionally, a FaceTest class tests the non-drawing methods of Face

Here is the UML class diagram for Faces that we developed together in class.

The Faces project when finished - one big Face and 7 smaller rotated Faces

Stage 1. An empty 500 x 400 frame appears

  1. Open Eclipse.
  2. From your individual repository, checkout the Java project called Faces
    • Use the SVN Repositories view to check out this project.

  3. Create a new class called FacesViewer with the usual main method.
    • As usual, let Eclipse type a stub for main for you.
  4. Write documented stubs for FacesViewer and its main method.
    • Your documentation should include words like
      Constructs and makes visible a 500 by 400 JFrame that has on it a JComponent that draws Face objects.
  5. Implement and test your documented stubs.
    • Test by seeing if the JFrame appears with the right size and an appropriate title, and that closing the JFrame exits the application.
    • Refer to Stage 1 of the SwingDemo1 instructions if you need reminders for how to accomplish this stage.
  6. Commit your work.
    • As usual, continue to do frequent commits throughout this project.
Stage 1: Frame appears

Stage 2. A circle and a filled circle appear (drawn onto a JComponent that is added to the JFrame)

Recall that you don't normally draw directly onto a JFrame. Instead, you:

  • Implement a class that extends JComponent (or a special type of JComponent like JLabel, JPanel or JButton).
  • Construct an instance of your class and add that instance to your JFrame.
  • Override the paintComponent(Graphics) method of your class that extends JComponent, putting the drawing statements in your method that overrides paintComponent.

Proceed as follows:

  1. Create a class called FacesComponent that extends JComponent.
  2. Override the paintComponent(Graphics) method that FacesComponent inherits from JComponent.
  3. Write documented stubs for FacesComponent and its paintComponent method.
    • Your documentation should (at this point) include words like
      Displays a circle and a filled circle.
      since that is all that FacesComponent should do at this stage.
    • Drawing these two circles is “throw-away” code that you will write solely to test that you have set up your FacesComponent class correctly.
  4. Implement FacesViewer and FacesComponent per this stage and test your documented stubs.
    • So at this stage, MyComponent should only make a circle and a filled circle appear, as in the picture to the right.
      • Your circles can be whatever size and color you like, placed wherever you like, as long as they test your FacesViewer and FacesComponent adequately.
    • Refer to Stage 2 of the SwingDemo1 instructions (for instructions on drawing in general) and Stage 4 of the SwingDemo1 instructions (for instructions on drawing circles) if you need reminders for how to accomplish this stage.
  5. After you are convinced that FacesViewer and FacesComponent are working correctly for this stage, comment-out the tests that make a circle and a filled circle appear.
Stage 2: A circle and a filled circle appear on the frame

Stage 3. Filled Faces appear, but with no outline and no eyes and mouth yet

  1. Create a Face class.
  2. Make Face implement Faceable.
    • We supplied the Faceable interface.
    • It specifies methods drawTo, translate and rotate.
    • We specified the interface so that we could (if we wish) interface your code with our own Viewer's.
    • Just have stubs for these 3 methods for now. The rest of the exercise will lead you through their implementation.
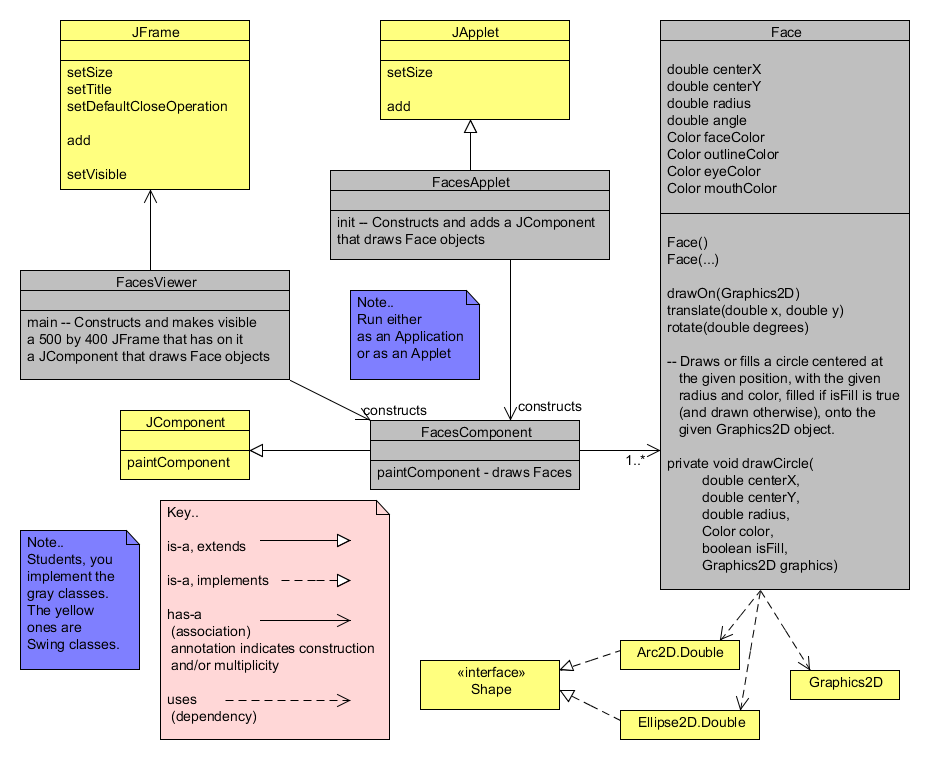
  3. Write documented stubs for Face, including (at this point) its:

    • default constructor that sets the Face's position (of its center), radius and color to defaults
    • constructor that sets the Face's position (of its center), radius and color to the given values
      • These are the only parameters that the constructors need at this stage.
      • You will implement the other paramters (e.g. eyeColor), per the UML class diagram for Faces that we developed together in class, in a subsequent stage.

    • drawOn(Graphics2D) method that draws the Face on the given Graphics2D object
    • private drawCircle method that (per the UML class diagram for Faces) has the following parameters (and only these paramters so far — the others will be implemented in forthcoming stages):
      • The center of the circle (as two double's or as a Point2D.Double, your choice)
      • The radius of the circle
      • The color of the circle
      • The Graphics2D object onto which to draw

    Also modify your documented stub for FacesComponent to indicate that it (at this stage)

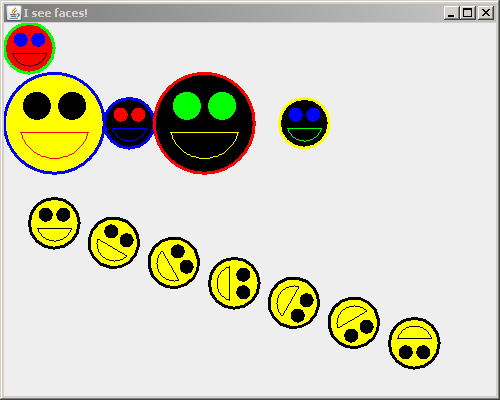
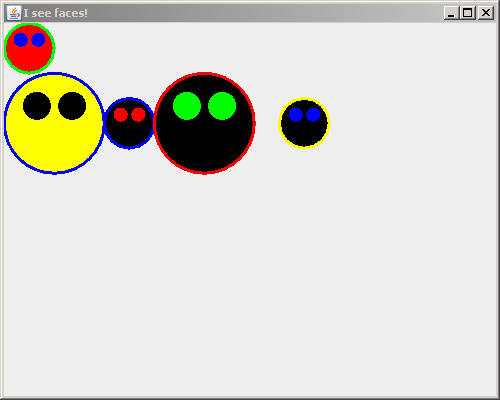
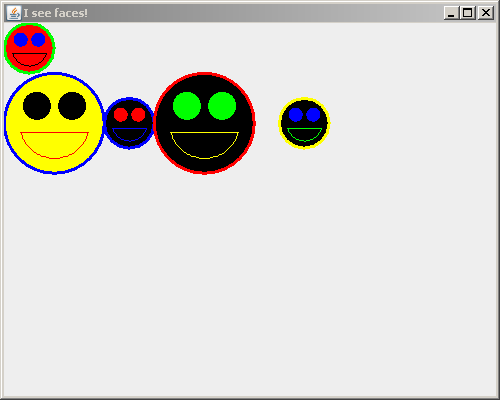
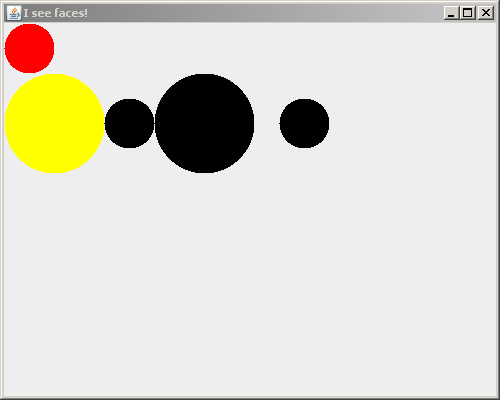
    Displays filled faces, but with no outline and no eyes and mouth yet
    since that is all that FacesComponent should do at this stage.

  4. Implement Face and FacesComponent per this stage and test your documented stubs.

    • So at this stage, FacesComponent should only display several Faces, but with no outline and no eyes and mouth yet, as in the picture to the right.
    • Internally, your program should use the constructors and methods listed above at this stage.
    • Your Faces can be whatever size and color you like, placed wherever you like, as long as they test your FacesViewer, FacesComponent and Face classes adequately for this stage.
    • Suggestion: in coding drawCircle, use the Graphics2D translate method .
      • For drawCircle, it doesn't really save you anything, but it will be VERY useful later in the project, so practice it now in drawCircle.
      • Here's how:
        • first translate the Graphics2D object to the center of your circle,
        • then draw a circle whose center is (0, 0),
        • then reverse the translation.
        For example:

            // Change the coordinate system so that (0, 0)
            // is the center of the circle to be filled.
            graphics2.translate(centerX, centerY);
        
            // Construct and fill the circle.
            // Ellipse2D.Double needs the upper-left corner,
            // not the center, as its first two parameters.
            Ellipse2D.Double circle = new Ellipse2D.Double(
                                            -radius, -radius,
                                            2 * radius, 2 * radius);
            graphics2.fill(circle);
        
            // Reset the coordinate system
            // to what it was before drawing the circle.
            graphics2.translate(-centerX, -centerY);
        

Stage 3: Faces with no eyes and mouths appear on the frame

Stage 4. Filled Faces appear, with outlines and eyes, but no mouth yet

  1. Augment/modify your documented stubs for Face to include (at this point):

    • default constructor also sets the Face's outline color and eye color
    • constructor also sets the Face's outline color and eye color to the given values

    Also modify your documented stub for FacesComponent to indicate that it (at this stage)

    Displays filled faces with outlines and eyes, but no mouth yet
    since that is all that FacesComponent should do at this stage.

    Also augment your documented stub for Face's drawCircle method to indicate that it has a parameter that determines whether to draw the circle filled or not.

  2. Implement Face and MyComponent per this stage and test your documented stubs.

    • So at this stage, MyComponent should only display several Faces, with outlines and eyes but no mouth yet, as in the picture to the right.
    • Get the outlines working first. That should be easy.
      • You might want to make the outline with a thicker-than-default line, like this:

            // Make lines 3 times their default thickness
            graphics.setStroke(new BasicStroke(3.0f));
        
               ... // Draw (using the thicker lines)
        
            // Reset line thickness to its default
            graphics.setStroke(new BasicStroke(1.0f));
        

    • To draw the eyes:

      • Refer to the Geometry of a Face diagram (focus just on the eyes in this stage; mouth in the next stage)
      • Note that translating the Graphics2 object to the center of the Face and then rotating the Graphics2 object by -45 degrees makes it easier to draw the left eye (using your drawCircle method).
        • That is, after the translation and rotation, the eye is centered at (0, blah), where blah is how far out the center of the eye is from the center of the Face.

      • Then rotate the Graphics2 object again, by 90 degrees this time, to do the right eye.
      • Don't forget to rotate another -45 degress after that to get back to where you were, regarding rotations.
      • Don't forget to then translate by negatives of the center point of the Face to get back to where you were, regarding translations.
      • The rotate method of the Graphics2D class takes the degrees to rotate in radians:
            graphics2.rotate(-eyeAngle * Math.PI / 180);
        
      • Don't get hung up on the geometry! Get help if your eyes don't come around quickly!
    • Your Faces can be whatever size and color you like, placed wherever you like, as long as they test your FacesViewer, FacesComponent and Face classes adequately for this stage.
Stage 3: Faces with outlines and eyes but no mouths appear on the frame

Stage 5. Filled Faces appear with outlines, eyes and mouths

  1. Augment your program to draw the mouths of your Faces, as in the picture to the right.

    • Use an Arc2D.Double object to draw the mouth. Look up its documentation as needed, but briefly:

      • An Arc2D.Double is constructed as part of a circle.
      • The first two arguments to Arc2D.Double's constructor are the upper-left corner of the bounding box (NOT the center) of the arc's circle.
      • The next two arguments are the width and height (NOT diameter, NOT radius) of the bounding box of the arc's circle.
      • The next argument is the degrees (NOT radians) to travel along the arc's circle to get to the beginning point of the arc.
      • The next argument is the degrees to continue along the arc's circle to get to the ending point of the arc.
      • The last argument is the way to “polish off” the arc, for example to draw an Arc2D.CHORD.
    • Refer to the Geometry of a Face diagram for the numbers to use to construct your Arc2D.Double.
    • Your Faces can be whatever size and color you like, placed wherever you like, as long as they test your FacesViewer, FacesComponent and Face classes adequately for this stage.
    • \

    • Don't get hung up on the geometry or the way that Arc2D.Double works! Get help if your mouths don't come around quickly!
Stage 3: Faces with outlines, eyes and mouths appear on the frame

Stage 6. Faces can be rotated and be translated

  1. Implement a
    translate(double x, double y)
    method that translates the Face's position by the amounts given in the arguments.

    • For example, in the picture to the right, the downward slanting line of yellow Face's (which each have radius 25) have been successively translated by (55, 20).
    • They have also been rotated, but wait for the next step for that.
    • All that translate does is change the coordinates of the Face. You have already written the code that displays the Face at its (translated) position. Implementing this step of your iterative implementation plan is just 2 new lines of code!
    • Translation is not animation; don't expect any animation here (although one could add animation, and you WILL do so in a forthcoming project).
    • Test your translate method by calling it inside a loop in FacesComponent.
  2. Implement a
    rotate(double angleToRotate)
    method that rotates the Face by the number of degrees given in the argument.

    • For example, in the picture to the right, the downward slanting line of yellow Face's (which each have radius 25) have been successively rotated by 30 degrees.
    • All that rotate does is change the field (which you must add) that stores the number of degress to rotate the Face.

    • Unlike translate, you have not yet implemented rotations of the Face in your drawOn method. But this is easy to do — 2 new lines of code in drawOn are enough to rotate the Face by the value stored in its degreesToRotate field.
    • Test your rotate method by calling it inside a loop in FacesComponent.
Stage 6: Translated and rotated faces appear

Stage 7. Run as an applet, then turn in your work

An Applet is Java code that can be run from a browser. As you will see, it is VERY easy to make an Application (which you have written) into an Applet.

  1. Examine the FacesApplet code that we supplied. Note that it is trivial to make an Application into an Applet — just a few lines of boilerplate per the example that we supplied, plus a call to the JComponent class that your Application adds to a JFrame.
    • The key is to do all the GUI work in a JComponent, because you can add a JComponent to a JFrame (as in an Application) or to a JApplet (as in an Applet).
  2. Select the FacesApplet class and press the Run button in Eclipse. (Or right-click on FacesApplet and select Run As ... Java Applet.) You should see your project run in the built-in Applet Viewer. It will look almost identical to the Application (just the title changes).
  3. Outside of Eclipse, find the Faces.htm file in your bin subfolder of your Faces project.
    • You might have to manually copy that file from the src subfolder of your Faces project, which is where we put it. It needs to end up in your bin subfolder, because that is where the executable .class files are.

    Open the Faces.htm file in your bin subfolder (that is, double-click on the file), to bring it up in a browser. It should look very similar to what you just saw in the Applet Viewer.

  4. Examine the html code in the Faces.htm file (by opening it in Wordpad, for example). Note that it is very simple to embed an applet in an html file.
  5. Commit your project to your individual repository when you are done.
    • Make sure that you have no compiler warnings left.
    • Magic numbers in your FacesComponent class are OK, but you should otherwise use good style. So consider doing a Control-shift-F on each of your files before your final commit.