Pi Setup - with LCD
This is an alternative way to set up your Pi, using a special LCD device in care of your instructor to obtain the MAC address. It avoids using an ethernet cable / wired connection.
It requires the following extra equipment, which are kept by your instructor.
- LCD device
- additional microSD card pre-loaded with software that displays the Pi's MAC address on startup.
After these steps are complete, you will no longer need this equipment to connect to your Pi "headless" via ssh from your laptop, as long as your Pi remains in the same wireless network.
In addition to the above extra equipment, you'll need:
- Your laptop (with Windows... if you use Linux or Mac, the instructions will be a little different)
- A Raspberry Pi 3 model B or Pi 4 project board.
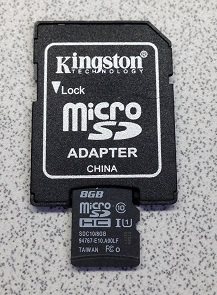
- A micro SD card (at least 8GB)
- An adapter that will let you plug the micro SD card into your laptop.
- A 2.5A micro USB power adapter (or another way to get 2.5 amps into the pi).
Gather this stuff, make sure you have it all before you start.
Register the Pi for Campus WiFi
This is where you need the LCD and microSD card provided by your instructor. For this step, you only need those and your Pi with power adapter.
Obtain MAC address using LCD
A MAC (media access control) address is a unique identifier for a network interface controller, such as found on your Pi. In order to connect your Pi to campus WiFi, you must register your Pi's MAC address with EIT. But first, you need to find the MAC address!
- Attach the LCD by plugging the bus into the GPIO header of your Pi. Loosely is fine (otherwise it can be tough to remove.)
- Insert your instructor's microSD card into your Pi. It runs a script at startup that prints MAC addresses to the LCD screen.
- Connect to power, booting the Pi off the provided microSD card.
- After several seconds, you should see the LCD display two MAC addresses, which each consist of 12 hex characters. Write down the 12 characters after
wl:, which is for wireless. (et:gives a MAC address for ethernet.)
At this point, you no longer need the LCD or your instructor's microSD card. Please don't steal these devices!
Register with EIT
- On your laptop, use a web browser to open https://clearpass.rose-hulman.edu/guest/guest_index.php. Log in, then select "Register New Device".
- Fill out the form: "Network Address" is 12-character MAC address. In the comment field, write a name of the form
<rhit username>-pi. For example, if your Rose-Hulman username is chenett1, usechenett1-pi. (We will set this as the pi's hostname below.) - Click "Register Device".
Prep the Disk
Get Raspbian
The natural operating system to install on your Raspberry Pi is a distribution of Linux called "Raspbian". This software is free, but it is large, so to save bandwidth you should download from our on-campus mirror.
On your laptop, download the Raspbian Disk Image and save it on your local machine. Since it's so big, you may want to put it somewhere that is not backed up. Download this from ON CAMPUS. It will be fast and not count against your quota. (If you must download from off-campus, you can obtain Raspbian from this website).
Install the O/S
- Extract the file you downloaded (it should contain one .img file). Do NOT double-click the file.
- Write the image onto your SD card.
- Insert the SD card into your laptop. Be careful not to bend the SD card or adapter.
- Obtain Etcher and install it.
- Find Etcher in your start menu and launch it.
- Select the file you downloaded in step 1 (Etcher may default to the wrong home directory, you might need to hunt for it.)
- Select the SD card you've inserted.
- Click the "Flash!" button to begin writing data to the SD card.
- Wait for the write to complete. Be patient—it will likely take 10-15 minutes.
- Insert the SD card into your laptop. Be careful not to bend the SD card or adapter.
Startup configuration
Once the SD card is written, we need to make three changes so that we can connect to the Pi wirelessly.
- In Windows File Explorer, navigate to the "Boot" drive (your newly-written SD card).
Enable viewing filename extensions so you can see and remove file extensions.
Enable SSH. In the Boot directory, create a new text file called
ssh(be sure there is no.txtextension)Tell the Pi how to connect to WiFi. In this case, this means the network RHIT_OPEN on campus. Create another file in the Boot drive named
wpa_supplicant.conf. Copy the following text into that file (including spaces beforessidandkey_mgmtlines):ctrl_interface=DIR=/var/run/wpa_supplicant GROUP=netdev update_config=1 country=US network={ ssid="RHIT_OPEN" key_mgmt=NONE }Change the hostname. (Source)
Create a file called
changehostnameand copy the following into it, with the nameMyLittlePion line 5 replaced by<rhit username>-pias above.mount -t tmpfs tmp /run mkdir -p /run/systemd mount / -o remount,rw sed -i 's| init=.*||' /boot/cmdline.txt raspi-config nonint do_hostname MyLittlePi sync umount /boot mount / -o remount,ro sync echo 1 > /proc/sys/kernel/sysrq echo b > /proc/sysrq-trigger sleep 5In the existing
cmdline.txtfile, remove the item withinit=(if it is there) and replace it with the following:init=/bin/bash -c "mount -t proc proc /proc; mount -t sysfs sys /sys; mount /boot; source /boot/changehostname"
Remove the SD card from your laptop. To do this from windows, first you must "eject" it via "Safely remove hardware". Once Windows has finished with it, you can remove it.
Hook up the Pi!
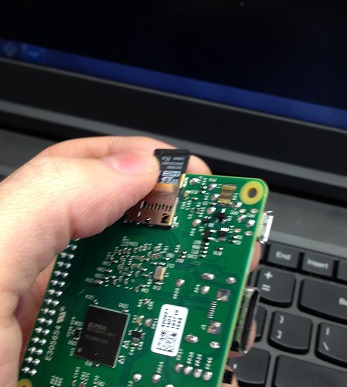
- Pull the microSD card out of the adapter, and insert it into the Pi.
->
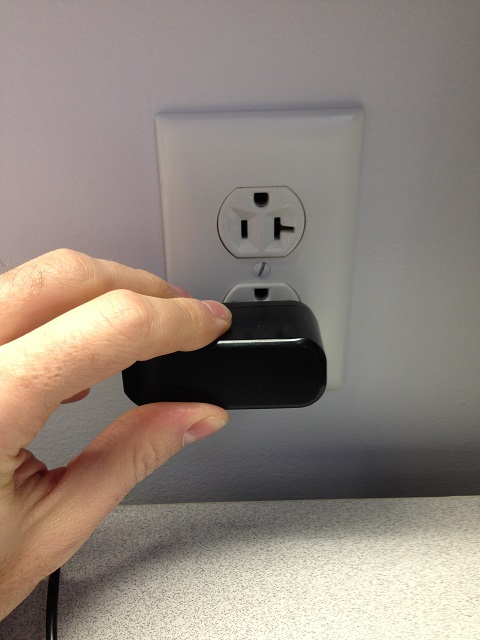
- Plug the AC adapter into a power outlet and into the Pi.
 ->
-> 
- Admire the lights on the circuit board. There should be lights in two places: on the top by the SD card and on the network port. Oooh. Pretty.
After about 30 seconds, open up Git Bash on your computer. Check if the Pi is live using the command
ping <rhit username>-pi.wlan.rose-hulman.edu. If you don't see something like the following, it's not connected. (To make it stop, type Control-C.)
- Once you've verified the pi is live on the network, you're ready for the next step: Control the Pi.