Lab 7: Networking
In this lab you'll extend your database program to be accessible over a network.
Goals:
- Get your pis talking to each other.
- Morph your database program into a database server
- Create a thin client to interact with the database over a network
- Test the limits of your database system
Add "find" to your database
If you implemented the find logic in the previous lab, great! Copy your
implementation of the 'f' command and do_find_all_matches into your lab7 repository.
If you didn't finish this in the previous lab, it's time to add searching to your
database. Finish do_find_all_matches, and test it. See the comments in
test.c for details on testing.
Make sure your pi's can talk to each other
You will want to test your work in this lab by connecting to your partner's pi and having your partner connect to yours. First you have to make sure it works.
If your two pis are both on the RHIT network directly (not connected to your laptop), you are all set! If not, follow these instructions:
You will need to enable "port-forwarding" from your laptop's network connection to your Pi's network connection. This will allow other computers on the Rose network to connect to your pi through your laptop's internet sharing.
You will forward incoming connections on your laptop (port 20000) to your pi on port 20000 through internet sharing. You can find many tutorials online, but here is a quick primer:
Find the IP address of your pi. (Log into the pi, type
ifconfigand look for the address of eth0).On your windows laptop go to the screen where you turn on internet sharing for your pi.
From there, click "Settings..." You'll see a "services" screen (this is what it looks like after you set up the port forwarding):
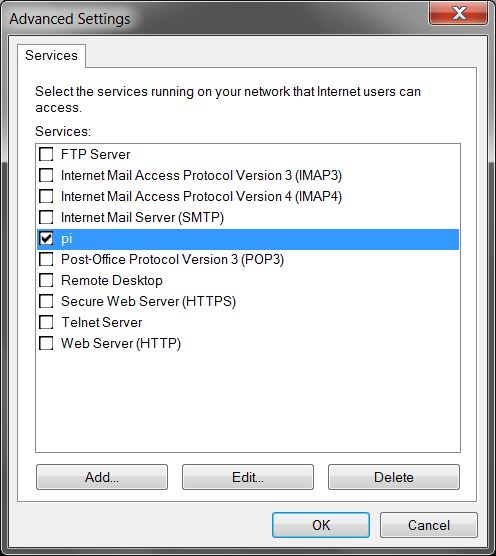
- Click "Add..." at the bottom to create a new "Service".
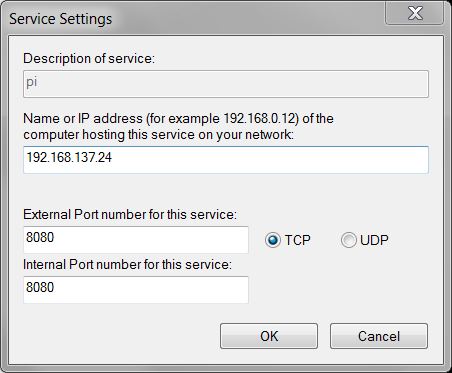
- Fill out the form. The "computer hosting the service" is your Pi. Put its ip address here.
- External and Internal port are both 20000 (the screenshot below shows 8080, but you should use port 20000)
- Make sure "TCP" is selected.
- Save the new service.
Find the hostname of your laptop. In windows, open the "Start" menu, right-click on "Computer" and select "Properties". Your host name is in the "Computer name" section.
It will look something like:stammsl-w541.wlan.rose-hulman.edu.Launch a server on your pi using port 20000 (the -l is a lowercase L for 'listen')
nc -l 20000Have your partner try to connect to your pi through your laptop:
nc <hostname>.wlan.rose-hulman.edu 20000When it connects, try sending lines of text back and forth. Type Control-D to exit.
If you have any trouble connecting, ask your classmates or instructor for help.
Repeat on your partner's Pi.
Create a Database Server
Inspect
server.c. Much of the code in here can be adopted from your previous implementation oflocal.c, but some is different.The First function to implement is
runServer. This function sets up the server socket and listens for incoming connections (handling one at a time). Things to implement:- Use
bindto bind the socket to an address - Use
listento make the socket listen for incoming requests - Inside the loop, repeatedly handle clients:
- accept the connection on a client socket
- call
handleRemoteInputto interact with the client - close the client socket using
shutdownandclose
- Use
Test out the server using
nc. Run the server and leave it running. Open another ssh connection to your pi (so now you have two windows). In the new window, connect to your server on the same computer using:nc 127.0.0.1 20000127.0.0.1 means "this computer". What does the server do? Is it what you expected?
Once you've got nc to cause your server to do something, try connecting to your server from your partner's pi or laptop.
Using either your lab6 version of
local.c, or the one provided for you, copy the body ofhandleLocalInputinto your server'shandleRemoteInputfunction.Modify
handleRemoteInputto send and receive from the socket instead of from stdin and stdout. Some hints:- Change your prompt to be "(Remote)>" instead of "(Local)>".
- You may want to comment out some of the commands and work on them work one at a time (uncommenting them as you work on them).
- Change
do_find_all_matchestodo_remote_find_all_matchesanddo_list_databasetodo_remote_list_database. - You'll need an additional string buffer for communicating with the socket.
sprintf()can be used to construct a string likeprintf.- remove Export and Import from
handleRemoteInputunless you want remote clients to mess with your files. - Since you're not using
getALine, you'll need to chop off newlines from received strings.
Implement
do_remote_list_databaseanddo_remote_find_all_matches. These will be very similar to the non-remote versions you implemented for lab 6.Test all your commands from your partner's pi.
Print the instructor verification sheet and show your instructor your working server!
Create a Client
The next step is to make your own version of `nc`. This will be very similar to the `local.c` file, but have significantly less code. The entire purpose of the client is to connect to a server and then send it whatever you type.Open up
client.c. There are a couple of functions with loops:handleLocalInputshould contain a loop that can only do two things: connect to a server or quit.do_connect_to_servershould contain a loop that will keep communicating with the server until it closes the connection.
This client will allow you to connect to many servers in sequence.
Implement
handleLocalInput. There's not much to do, and it will look like yourhandleLocalInputfrom lab 6 but with fewer commands. The commands to implement are documented in the file.Implement
do_connect_to_server. This function does the following until the server closes the socket:- receive data from the server
- print what it received
- get a line of input from you
- send your input to the server
Test your client with the server solution provided.
Show your instructor!
Test your client and server
Finally, make sure your server and your client can talk to each other.- Try using both yours and your partner's pi to connect across a network.
- Find another team and try communicating with their client and server.
Finishing the Lab
- Make sure any files you've created are added to SVN.
- Ensure your name and your partner's names are on all the files you edited.
- Commit your files to SVN. Only one of you two must commit the code to SVN, but both your names must be on all files you changed. It's a good idea to make sure your partner also has the code.
- Hand in one instructor verification sheet in hardcopy (with both your names on it).