CSSE 120R Final Python Robotics Project—Winter 2009-2010
Disclaimer: Some details may still be vague; feel free to ask for
clarification. Some may also be subject to change; we'll alert
you when they do.
Project Requirements
The final project for the Python part of this course is to
implement a GUI for robot control that includes reacting to another
robot's motion! The gold standard is to be able to follow another robot
around a track.
Your project must satisfy these core requirements:
- You must complete the implementation of a GUI to control your
robot.
- You must implement code to send and receive motion information
from another robot.
- All team members must contribute to and understand
their project.
Most of the work on your project will be translating the guidelines
provided into a working implementation. If you are having trouble
planning or getting started, get help. It is much better (and easier)
to get help early and start off with a good plan than to try to hack a
poor design into a semi-functional program in the final days before it
is due.
Milestones
To make sure that you are on-track to complete your project, you
must meet the following milestones. Each milestone will contribute to
your overall project grade. Each milestone must be done at the
beginning of the specified class session (no 24-hour extensions).
This is so we can help you in class as needed. For each milestone, you
must commit your work to your repository and include a clear commit
message stating that that milestone is completed.
- Session 16 (mid session) -- Checkout
the project. The name of the repository is
http://svn.cs.rose-hulman.edu/repos/csse120-201010-teamXX
where XX is your team number as announced by your
instructor
- Check out the RobotFollower project, and find
the module robotFollower.py within it. Each team member
should independently add his or her name to the comments at the top of
the file. This involves each of you editing the file, so it requires
careful use of SVN. For example, the first team member should update,
edit, then commit, then the second member repeats
this cycle, then the third. Everyone should then
update.
Follow this cycle of update-edit-commit whenever you make
changes to your program.
- Session 17
- Basic GUI. At this stage, you must allow the
user at least to connect to a port and disconnect. You must also allow
them to drive the robot directly (forward, reverse, spin left, spin
right, stop) and follow a line.
- LineFollowing works and is "interruptable" by the
user. That is, you must integrate your line following into the
program's main event loop so if another button (like one of the direct
drive buttons) is pressed during line following, it responds to it.
(Therefore, this requires more than just calling your pre-written line
following function; see the provided code for hints.) Be ready to show
off the basics to your instructor and the TAs.
-
Session 18 — Motion information sent and received.
Here, you need to be able to send information about your motion to
another robot and receive it. You should do a basic test on your own,
like making sure you can properly receive your own IR signal. You'll
need to have another team with you to test this fully, so Session 18
will be devoted to working in class with another team on testing.
-
Session 19 — Core functionality completed.
Here, you'll show off your whole program to your instructor and the
TAs. This is a "dry run" of tomorrow's demo, so you have time to make
any needed adjustments.
- Session 20 — Program finished and fully functional. You
have 5 minutes per team (only) to demo your robot. Make sure it
works reliably to get the most points you can in your 5 minute demo.
- Session 21 — Team evaluation of your partners. This can
be found in Angel under Lessons.
Grading
Here is the rubric we will
use to grade your program. Note also:
Project grades will be based on both individual and group results.
We will check off each project milestone, to make sure you are
making steady progress.
The final program will be graded based on the proper functioning of
your program.
The program will also be graded on your design, coding style, and
documentation, including SVN commit messages.
The grade can also be bumped up some due to your creativity. While
you can earn an A by following the requirements in this document,
sometimes students think of even cooler things to do to demonstrate
their understanding. What challenges you?
Each team member will be required to complete an evaluation survey
about his or her own performance and that of each of his or her
teammates. We will use these surveys and our own observations to assign
individual project grades.
Details
GUI
Your GUI must support as a minimum:
- Connecting (to the specified port number) and disconnecting from
your robot.
- Driving your robot directly at the specified speeds.
- Line following.
- Sending your motion information as you move.
- Responding to another robot's motion in traffic (best would be
while going around a line).
- Playing a very short song.
Example:
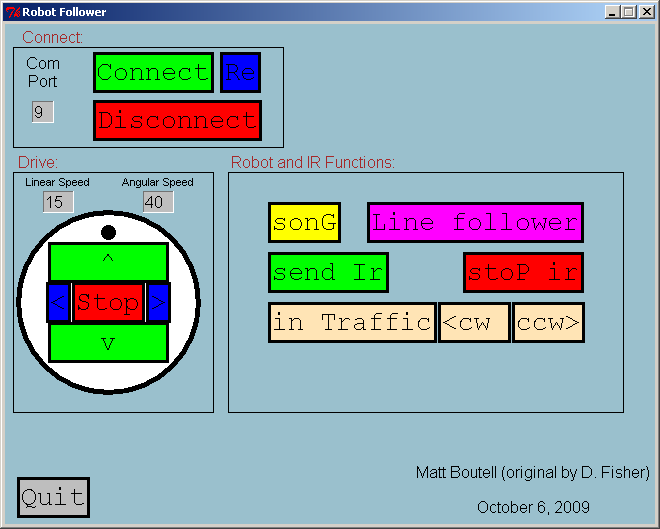
This is just a sample of what our GUI looks like. You can use
the given layout or make your GUI look
different, but you shouldn't waste hours moving rectangles. Focus
on the interesting parts of the project, like robot following in
traffic. The capital letter shows the quick key for each button.
We have included a RobotButton class in the project. This will allow
you to make any additional buttons you'd like. See how we made the
given buttons as an example.
Note: the Re button is for Disconnect and Reconnect. This
button seems worthless but is a good solution to the sensing garbage
problem. With it, if one senses garbage, one can click on the Re
button to disconnect and connect again, which fixed the sense garbage
for us almost every time.
IR Communication
The IR sensor on the front of the robot can receive a single byte of
information from another source, whether it be another robot, the
docking station, or even a virtual wall. Furthermore, the robot can
repeatedly send a single byte out of its omnidirectional
IR transmitter (below). Between the two, we have the ability for two
robots to communicate with each other. We will implement a very simple
protocol to help two robots navigate in "traffic", so they don't hit
each other.
Protocol
Assume that two robots are travelling around a track. To keep from
bumping into each other, they need to communicate their direction
(clockwise or counter-clockwise) and their linear velocity. (Angular
velocity doesn't really help on a track.) But, we can't send infinite
precision data: we only have 1 byte to work with.
A byte is an 8-bit number, like 01011100 (which has value 0*2^7 + 1
* 2^6 + 0 * 2^5 + 1 * 2^4 + 1 * 2^3 + 1 * 2^2 + 0 * 2^1 + 0 * 2^0 = 64
+ 16 + 8 + 4 = 92). There are 2^8 possible values of a byte, ranging
from 0-255. On the robot, 255 means that no signal is seen. We get to
define the other 255 values. We could use any protocol we wish, as long
as we standardize. Therefore, I decree the following standard:
- The first bit (ie the Most Significant Bit, MSB) will be used to
send direction: 1 = clockwise, 0 = counter-clockwise.
- The last 6 bits will be used to send linear velocity in cm/sec.
The max linear velocity is 50 cm/sec, which is less than 2^6 -1 = 63,
the max value that can be sent with 6 bits, so it's more then enough
space. There should be no reason to have to send negative numbers,
since robots won't be backing up as they travel around the track.
(Imagine trying to do line following while driving backwards -- without
cliff sensors on the back of the robot, ha!)
- The second bit is reserved (meaning it should just be left as
zero)
Sending Motion Information
If the user clicks on the send IR button, it should start sending
its current motion information. If the robot is stopped, that will send
the IR value 0 or 128, depending on the direction the robot is facing
on the track. Your program should start assuming counter-clockwise (0).
When the drive forward button is pressed, it should change the linear
velocity it is sending to that value. If any other drive button is
pressed (left, right, or reverse), it should send a linear velocity of
0. When the CW or CCW button is pressed, the value of the IR number
should change its Most Significant Bit if needed. You should also
change the linear velocity sent anytime you change the linear
velocity of your robot, like when you are line following. (If you are
doing line following using drive or driveDirect, you'll need to convert
to a linear velocity.) You may think of other times you'll need to
change it.
Receiving
Let's say you receive the byte 153 from another robot. You know that
the other robot must be travelling clockwise at a rate of 25 cm/sec.
(If you think about this, you should see that the conversion back and
forth from a byte to a direction + linear velocity is pretty
straightforward. And if not, feel free to ask!) How my robot responds
to that message depends on how my robot is moving.
We need to agree on who has the "right of way" while driving. Let's
assume the following cases:
- The robots are travelling in opposite directions.
Let's say that the robot travelling clockwise has the right of
way. Therefore,
- If my robot is driving counter-clockwise, it needs to do an
about-face (and start driving the other direction, ideally). Turn at a
rate of 45 degrees/second for 4 seconds.
- If my robot is driving clockwise, it needs to wait for the
other robot to do an about-face, so sleep for 5 seconds (to give it a
small head-start), then start driving again. Hopefully, it can then
catch the robot in front. If so, that leads us to case 2 (next).
- Both robots are going the same direction. The
robot in back can see the robot in front, but not the other way around.
The only way that the back robot could suddenly see the front robot is
if it were driving faster than the front robot. The robot in back
should respond by either:
- stopping altogether so it doesn't bump the robot (simple, but
boring)
- slowing to a crawl, so it hopefully doesn't bump it (almost
as simple, but better)
- attempting to match its velocity to the other robot's, so
they travel together (this would be extremely cool!)
Hardware
- Omnidirectional IR Transmitter. This is the
"hat" with 8 IR LEDs that sits on the BAM (wireless receiver) module.
Place it on top of your BAM and plug the red
wire into +5V (there are
two holes from which to choose) and the black wire
into LD1, both on the back of the BAM.
- Blinder. This is a little black ring that fits
on the IR receiver. It blocks out signals from all directions except
one, which is important so you avoid cross-talk (receiving multiple
signals at once that it can't distinguish). Hint: Place the opening
towards the back (your own transmitter) to test if you can receive your
own signal. Typical usage is to have the opening towards the front, so
you can receive transmissions from robots in front of you. Get one from
me if you don't have one.
Demo
Each team will have a short amount of time (~5 min) in class to
demonstrate their program's interaction with another robot to the
instructor and the class. You will be judged on your preparedness, your
program's functionality and how well each of the
team members can explain the code. (This is to encourage you all to
work on the code together and to contribute to it.) Ask me ahead of
time if you want to demo your program with a specific team.
Suggestions
- Plan first! Think about how to use top-down design and/or
dictionaries. Get help early if you need it!
- Functions are your friends. Well-written ones will make your
life so much easier! Encapsulate functionality!
- You will likely have certain information that many functions
will need to access. You may want to put all this information in a
dictionary object and pass it into the functions. I created a
robotInfo dictionary that contained the robot itself, its direction,
its linear velocity, and if it was currently sending IR information.
That worked well.
- Test early and test often. Don't write more than a handful of
lines of code at a time without testing it. Sometimes, this will
mean writing test code that doesn't make it into your final submission.
Welcome to the real world of software development!
- You will likely want to keep track of the various states your
robot is in, such as whether or not it is currently sending IR
information and whether or not it is currently line following or robot
following. You can use Boolean variables for these and check them each
iteration of the event loop to see if you have to do that step, like
drive a tiny bit around the track. The starting code already
includes Booleans for lineFollowing and robotFollowing.