CSSE 120R Final Python Robotics Project—Winter 2008-2009
Disclaimer: Some details may
still be vague and subject to change; we'll alert you when they do.
Project Requirements
The final project for the Python part of this course is to implement
a GUI for robot control that includes an Infrared Artist!
Your project must satisfy these core requirements:
-
You must complete the implementation of a GUI to control your robot.
- You must implement IRMapper and IRColor classes.
- All team members must
contribute to
and
understand
their project.
Most of the work on your project will be translating the guidelines
provided into a working implementation. If you are having trouble planning or getting started, get help.
It is much better (and easier) to get help early and start off with a good plan than to try to hack a poor design
into a semi-functional program in the final days before it is due.
Milestones
To make sure that you are on-track to complete your project, you must meet the following milestones.
Each milestone will contribute to your overall project grade. Each milestone must be done
before
the specified class session unless specified otherwise. For each milestone,
you must commit your work to your repository and include a clear
commit message stating that that milestone is completed.
-
Session 17 (mid session) -- Checkout the
project. The name of the repository is
http://svn.cs.rose-hulman.edu/repos/csse120-200920-teamXY
where
X
is your section: Boutell = 3, Fisher = 4.
and Y
is your team number as announced by your
instructor
-
Check out the InfraredArtist project, and find the module
robotGUI.py
and
IRMapper.py
within it. Each team member should independently
add his or her name to the comments at the top of the files.
This involves each of you editing the file, so it requires
careful use of SVN. For example, the first team member should update,
edit, then commit, then the second member repeats this cycle, then the third. Everyone should then update.
Follow this cycle of update-edit-commit whenever you make changes to your program.
Note that we have included a local version of ZelleGraphics
in the folder. This version allows for keyboard input as well!
-
Session 18
- Basic GUI. At this stage, you must allow the user at least
to connect to a port and disconnect. You must also allow them to drive the robot directly (forward,
reverse, spin left, spin right, stop).
- IR Mapping works on simulated data. First, you need to be
able to simulate the robot traveling around the room using
the provided test files (line
following test file and home
base test file).
You don't need a robot to make an IR Mapper object.
You need to feed it distance traveled, angle change, and IR
value data. Make sure you separate out your project
into workable pieces. The IR value will be used when
selecting the color to use when painting.
-
Session 19 — Core Functionality Completed.
Here, you need to be able to feed the IR Mapper actual
information from the robot so it can map its environment. Be
ready to show off the basics to your instructor and the TAs.
- Session 20 — Program Finished and fully functional, including any enhancements (below).
You will be part of a demo and competition in class. You have
5 minutes (only) to demo your robot to the instructor. Make
sure it work reliably to get the most points you can in your 5
minute demo.
- Session 21 — Team Evaluation of Your Partners.
This can be found in Angel under Lessons.
Grading
Project grades will be based on both individual and group results. We will
check off each project milestone, to make sure you are making steady
progress. The final project program will be graded based on both the proper functioning of your program and an evaluation of your design,
coding style, and documentation (including SVN commit messages). The grade will also depend heavily on what enhancements you add (see below).
Each team member will be required to complete an evaluation survey about his or her own performance and that of each of his or her teammates.
We will use these surveys and our own observations to assign individual project grades.
Here is the rubric we will use to
grade your program.
Details
GUI
Your GUI must support as a minimum:
- Connecting (to the specified port number) and disconnecting from your robot.
- Driving your robot directly at the specified speeds.
- Making an IR map of the room.
- Playing a very short song.
Example:
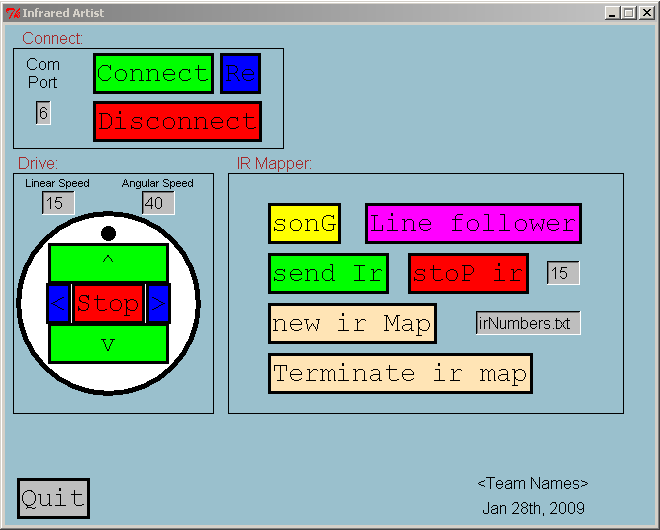
This is just a sample of what my GUI looked like. You can use the
given layout or make your GUI look different,
but you shouldn't waste
hours moving rectangles. Focus on the interesting parts of the
project, like IR Mapper. The capital letter shows the quick key for each button.
Note: the Re button is for Disconnect and Reconnect. This button
seems worthless but is a good solution to the sensing garbage problem.
With it, if one senses garbage, one can click on the
Re button to disconnect and connect again, which fixed the sense
garbage for us almost every time.
IRMapper Class
The purpose of the IRMapper Class is to paint a map of the IR values
seen by the robot. For example, if the robot is seeing an IR value
of 248 it should be using a Red pen. When the iRobot makes a
position calculation, it makes a circle at that location and connects a
line to the prior point. In order to determine which color to use
when a certain IR value is seen, the IRMapper needs to open a file which
has the following format:
# IR signal, Color name, Description
There could be as many as 255 lines in the file if every IR value were
defined. Here is a sample of that file for the IR values that
relate to the docking station:
242, blue, Force Field
244, green, Green Buoy
248, red, Red Buoy
255, gray, No Signal
The complete file, irNumbers.txt, is in your project folder. You will need to read this file when you construct an IRMapper object.
To store the 3 values on a given line, you will construct an instances
of the IRColor class (below). The IRMapper class will thus contain a
list of IRColor objects, one object for each line of the file. (Note: we
acknowledge that an alternative would be to use a list of lists, but
lists of objects are the preferable way to do this, and extra practice
creating objects will help with Exam 2).
The IRMapper class will be constructed by passing it the following
information: a filename with the color IR information, the parameters
necessary to create a new GraphWin window, and information about where
the robot should start off in the window. All constructor values
should have a default set. Here is an example of the constructor
input parameters.
filename =
'irNumbers.txt',,
windowTitle = "IR Map",
windowX = 600,
windowY = 400,
startingPoint = Point(200,200),
startingAngle = 0
The primary
task of the IRMapper class is to receive a new distance and angle from
the robot and draw a circle at the new calculated location.
This will take a bit of math. To make the math a bit easier we'll
always use the ratio of 1 pixel = 1 centimeter. So the
default
values above made a 6 meter by 4 meter window.
Example 1
The robot is at (0,0) and currently at a 0 degree
angle. We will define pointing directly to the right as zero degrees and
CCW as positive (so 90 degree is straight up). If the robot moves
8 centimeters and rotates 0.2 radians then you need to calculate the new
location and position.
averageAngle = old angle + the 0.2 radian change / 2 #
note: your solution might not need to divide by 2; ask your instructor
about this.
deltaX = 8 * cos(averageAngle)
deltaY = 8 * sin(averageAngle)
new X = old X + deltaX
new Y = old Y - deltaY # Since positive numbers are
down
new Angle = old angle + angleChange
This makes the current location
x = 207.960033322224 centimeters/pixels y = 199.201332666825 centimeters/pixels
angle = 0.2 radians
Example 2
This time the robot moves 12 centimeters and
-0.8 radians
(see if you can do the math manually)
This move makes the current location
x = 219.720832256319 centimeters y =
201.585364636366 centimeters
angle = -0.6 degrees
Required methods
The class must support the following methods:
constructor as defined above
moveDistanceAndAngle(distanceTraveled, angleTraveled, irValue)
setCircleDiameter(newCircleDiameter)
Suggestions
It might be helpful for the class to have things like the following:
Instance fields to store the following information:
The current location of the robot stored in centimeters/pixels as a Point
The current angle of the robot stored in radians
A window to draw in
Circle diameter to use when drawing (default = 3)
A list of IRColor objects
The window X and Y sizes for gridlines and message box
A text message that displays the description of the IR value being seen
I also found it handy to make methods to the IRMapper that would let me control the window:
def getMouse(self):
self.win.getMouse()
def close(self):
self.win.close()
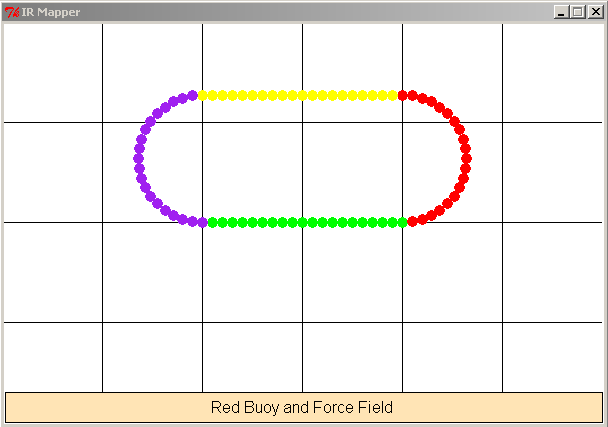
Your IR Map should have a white background and grid lines clearly showing
1 meter grids. Here is a sample image (obviously from fake sample
data, with some extra colors). I think when you run the test #1,
you will see the yellow and purple showing up in red. This image is a 600 x 400 image with the iRobot
starting at 200 x 200 (the default values).
Here is a map coming from real data following the track:
(You can see colors where the iRobot is picking up an IR value)

Then I also made a log of moving back and forth in front of a home base.
It looked like this:
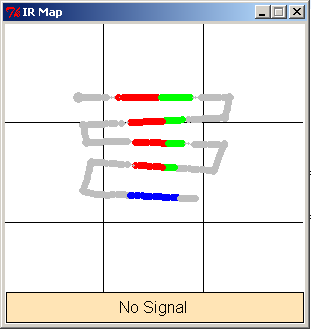
Admittedly I made a log file from my iRobot then went in and did a
little doctoring to make the images look better.
To test the IRMapper class I provided you with these files, and the code
necessary in main to test your IRMapper when you finish it. Test
your classes with simulated data before you try to use the robot real
time.
IRColor Class
This class is a simple data structure for objects that store the irNumbers.txt
info. It is common to make small classes to do simple functions. In
this case, the constructor will take as a
parameter a line (string) of the irNumbers.txt file containing the IR
Value, color to use when painting, and the description of the IR
value. It will then split it and store
the IR value, color, and description. It must implement the
following functions.
class
IRColor:
"""Simple data structure to store the IR number, color, and
description"""
def
__init__(self,fileLine):
def
getIRNumber(self):
def
getIRColor(self):
def
getIRDescription(self):
Hardware
- Omnidirectional IR Transmitter.
Place it on top of your BAM (wireless receiver) module and plug the
red wire into +5V and the black wire into LD1, both on the back of the BAM.
Demo
Each team will have a short amount of time (~5 min) in class to demonstrate their program,
especially your enhancements to the instructor.
You will be judged on your program's functionality and how well each of the team
members can explain the code. (This is to encourage you all to work on the code
together and to contribute to it.)
Art Contest
Bringing it all together in a controlled drive competition!
You will use your direction buttons to drive
your robot around a 6 foot by 4 foot area. The area will be setup
by your instructors to have some IR values in the 6' by 4' area.
We might have a docking station, an iRobot or two transmitting values
(which might change with time), and maybe even a virtual wall (which you
haven't seen). You will be driving around the area (with your IR
off) painting the canvas! Doing well in the Art Contest will help
your enhancements score (see below about enhancements).
Suggestions
-
Plan first! Use top-down design and/or object-oriented design. Get help early if you need it!
-
Functions are your friends. Well-written ones will make your life so much easier! Encapsulate functionality!
Enhancements
Once you are done with the project requirements, you will then add some
enhancements. You will earn a higher grade for doing more challenging ones, and the more, the better.
Here are some suggestions, to get you thinking.
-
Make your IRMapper images come out really well. Have a nice
description display, etc. I feel like my images shown above
are pretty good, but could you do better?
-
Make a line-following while IR Mapper. Can you follow a line track and paint as you travel? You will need to stay on the line and during your travels you will see various IR values.
When you see an IR value you will change the color of your paint brush. Your goal is to make the good representation of the track with appropriate color changes.
This is a fun one to add, personally I like this one. Tracks
will be brought over to the demo day.
- The default image of the map should be 6 meters wide and 4 meters tall
with a white background and grid lines every 1 meter. Make your code
more flexible to where it can use any size window and any robot starting
point. Again use a 1 pixel = 1 centimeter ratio, with 1 meter grid
lines. You can see an example of this enhancement my in the back
and forth past home base image. The test's with the simulated data
will test this enhancement for you even.
- Make your iRobot really fast going around a tape line! Sub 8-10
seconds per lap would be impressive.
- Make a new method of motion control! In the requirements, you
must make buttons for forward, spin left, reverse,
spin right, and stop. But wouldn't it be fun it you could just click
on your IR map and the robot would go to that location? Implement
that task as a major enhancement.
- Be creative: what's cool and challenges you?