| Table of Contents |
Most of what goes on in a laboratory can be described as "making measurements" of some sort. This is true at every level, from the elementary lab to the professional research laboratory. A measurement consists of comparing an object, in some quantitative way, to a pre-existing standard or scale of values. In measuring the width of the laboratory bench with a meter stick, you're comparing the width to a set of subdivisions of a given standard length called the meter. Your comparison is expressed in certain units -- the width is so many hundredths or thousandths of a meter. The precision of the comparison is limited by the measurement process: your eye won't register subdivisions of the meter smaller than a few parts in 104. These features are common to measurements of all sorts.
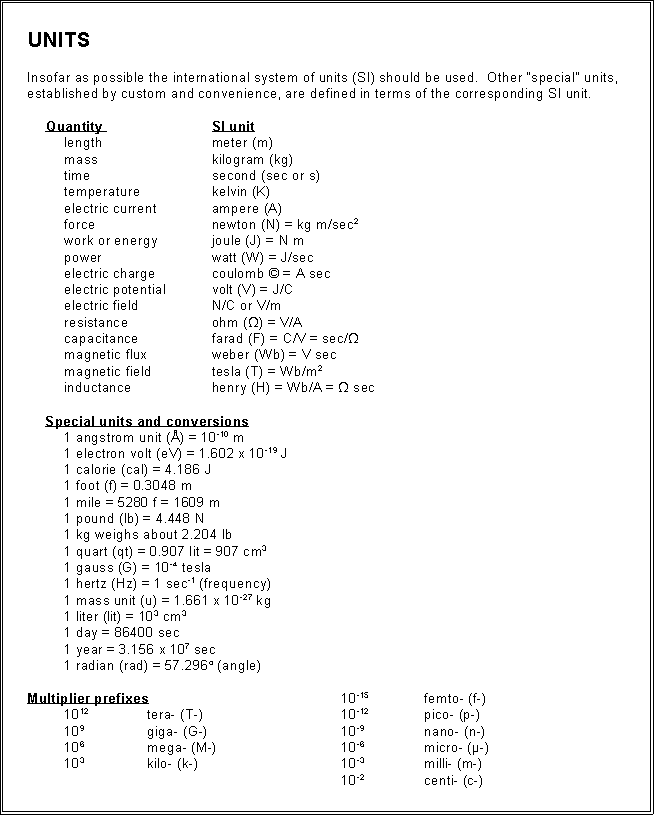
The units of a physical quantity are an essential part of its expression. And since much of what you do involves manipulating several different quantities to calculate others, it's important that you work in a consistent system of units. If you measure how far something goes in feet, in a time given in minutes, and calculate its velocity in furlongs per fortnight, it may or may not be wrong; but it is certainly confusing. Insofar as possible, you should work with units in the standard international system of units (SI or MKSA), or with other units, such as grams or centimeters, that are simple decimal multiples of SI units. But take your data as it comes: if you have to measure something with a ruler graduated in fractions of an inch, write it down that way and then convert it to meters or centimeters at once. The SI units are summarized in the table at the end of this section.
In the same spirit, convert angles to radian measure. You are more used to degrees, but you will be using some formulas that are true only if you express angles in radians. In some experiments, to err by a factor of 57.3 can be hazardous to your credibility!
Every measuring instrument has some built-in limitation on how precisely it can be read. When you measured the width of your lab bench with the meter stick, various factors (the width of scale marks on the stick, parallax in your sight of the scale, alignment of the stick, irregularity of the bench's edges, etc.) limited the result you got to probably not much better than plus or minus 0.001 meter. You should acquire the habit of making some such estimate, getting some feeling, of the intrinsic experimental limitations on every measurement you make.
When you are faced with an unfamiliar instrument or technique, you do this simply by getting some experience with its use (or, as a last resort, falling back on the manufacturer's specifications). Always read a measuring instrument as precisely as possible. Many elementary measuring devices -- rulers, ordinary electrical meters, pan balances -- are analogue, as opposed to digital, devices: that is, the scale of possible readouts is continuous. Such instruments should always be read to some fraction of the smallest scale division; you always take as much information as the device will give you! If you're using a meter stick graduated in millimeters, you interpolate your reading to the nearest 0.5 or 0.2 (conceivably even 0.1) millimeter.
A digital measuring device, one that "counts," like a Geiger counter or a digital clock, can at best only be read to ±1 in its last displayed digit.
On devices intended for very precise measurements, various tricks can be used to expand or sharpen your ability to interpolate your reading of the scale within its smallest division. One of the most common is the vernier scale.

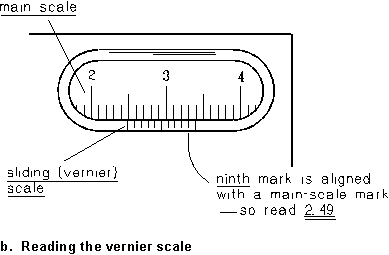
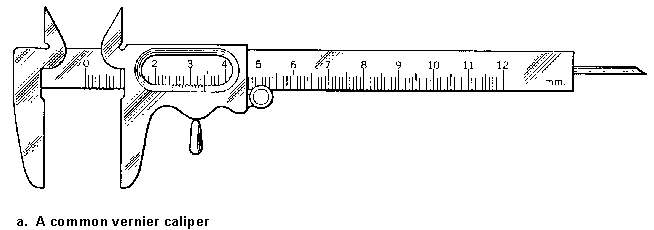
Figure 1 -- The vernier
A typical vernier caliper is shown in Figure 1a. The main scale of the caliper is marked off in millimeters, and it is read against an index mark that slides with one of the caliper jaws. The main scale and the sliding index are shown expanded in Figure 1b; it is reading something between 2.35 and 2.40 cm. The vernier scale is a second scale marked on the slider, beginning at the index mark. Its smallest division is exactly 9/10 of the smallest division on the main scale. This causes the alignment of marks between the main and the vernier scales to be staggered, with 10 vernier-scale divisions just equaling 9 main-scale divisions. Now look along the vernier scale until you find the mark that just lines up with one of the main-scale marks. In Fig. 1b, it looks like it's the seventh of the ten sliding-scale marks; it follows that the index mark is just 0.7 of the way along the main-scale division it's in, so the scale is read as 2.37 cm. In general, if there are N divisions on the vernier and the nth mark lines up with a main-scale mark, the index position is n/N of a division past its mark on the main scale.
Vernier scales are used in a wide variety of instruments to subdivide a scale. On the optical spectrometers you will use in PH 245, a vernier scale subdivides each 1/2 degree of angle into 30 parts, so the angle scale can be read to 1/60 degree, or one minute of arc.
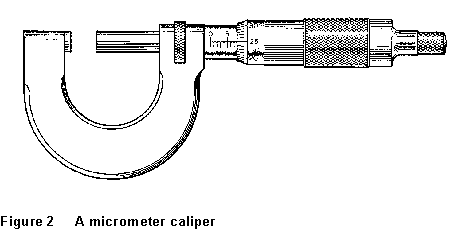 Another
dodge used to subdivide the scale of a measuring instrument is the micrometer
screw. In this case, the index is moved along the scale by rotating
a precisely machined screw; the angle through which the screw has been
turned subdivides each turn into (usually) 50 parts. A common micrometer
caliper is shown in Fig. 2. The sleeve has been turned until the main scale
reads somewhere between 7.5 and 8.0 mm. The scale on the rotating sleeve
subdivides this range into 50 parts. In the figure, this scale reads 25,
so the reading of the caliper is 7.5 + 25/100 or 7.75 mm.
I've been talking about taking all the information that your instrument will give you. The other side of the coin is: you never proceed as if you have more information than the instrument did give you. It is crummy practice to show a result to five decimal places when in fact, because of instrumental limitations, only the first two decimal places are significant.
A simple example will show you what I mean. You have just measured the length of a laboratory table with a meter stick as 305.5 cm, and its width as 112.54 cm, and you want to calculate the area of the table top. If you've read your instruments as closely as you can, there is some uncertainty in the last digit of each of these numbers. That is, in reading the width you interpolated between the 12.5 and 12.6 cm marks -- you estimated 12.54, but there's some slop in the estimate. Now multiply width by length, and keep track of the "uncertain" (bolded and italicized) digits all the way through:
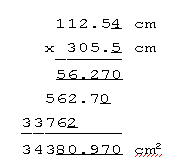
Each uncertain digit introduces some uncertainty into every digit of everything that's affected by it; the uncertain digits in the factors have "contaminated" the last five digits of the product. To carry these contaminated digits around would be pointless and misleading; instead let's make a rule that no more than one uncertain digit is to be expressed. Then you'd give the area of the table top as 34380 cm2 (or, better yet, as 3.438 x 104 cm2}.
We say that we have only "four significant figures" in the result; to quote 34380.97 cm2 or even 34381 cm2 would be to claim more information than your measurements actually gave you, which is not only inelegant but downright wrong.
Here are a couple of rules for carrying significant figures through a calculation:
Notice that one of the virtues of "scientific" (powers-of-ten) notation is that it can keep track of significant figures automatically. If I tell you that it's 39,000 meters from here to Mudville, you can't tell how precise I think the number is; but if I write 3.9 x 10⁴ or 3.900 x 10⁴ meters, there's no ambiguity.
