Installing Ubuntu on your computer
After completing the pre-installation steps above, follow these steps to install Ubuntu on your laptop. Follow these steps carefully, skipping none.
- Insert USB drive, connect network cable and reboot.
- During the Thinkpad splash screen, repeatedly press F12 until it says "Preparing Boot device list". Select USB device to boot from.
- When the screen appears that displays the Ubuntu logo and "Select a language", the USB stick can safely be removed.
- Note that during this install, the touchpad will more than likely not work. Use the point stick or external mouse for the install.
- Select language: English.
- Select Location: United States.
- Configure the keyboard: English (US).
Select keyboard layout: English (US). - Configure the network: Choose ethernet device (eth0) and NOT wireless (wlan0).
- Enter a hostname (currently set to dhcp-137.112.xxx.xxx): leave as-is or change to another hostname you wish to use.
- Choose a mirror of the Ubuntu archive: Press "a" to go to the top of the countries and press the up-arrow to select "enter information manually".
- Change "mirror" to ftp.csse.rose-hulman.edu . Leave the archive mirror directory as-is (/ubuntu/).
- Leave proxy information blank.
- Enter your full name.
- Enter your desired username.
- Select a password and enter it twice.
- Do not encrypt home directory.
- Verify timezone America/Indianapolis.
- Partitioning Disks: With laptops having as much free memory as they now do (4-8 GB), a Swap partition is rarely used, if it all. For this reason, I recommend NOT using the Guided - resize partitioning method during the install. If this mode is selected, Ubuntu will automatically make a swap partition that is equal to the installed RAM. On the 530W laptops, this is an 8 GB partition!
- On the partition Disks screen, select Manual and click Continue.
- Select the partition of your hard disk that contains your Windows operating system and click Continue. In this case, it is partition #2 (note that partition #1 is only 104.9 MB and is bootable; this is clearly not the Windows partition).
- Select Resize the partition (currently ??? GB) and click Continue.
- On the next screen, select Yes to Write previous changes to disk and click Continue.
- Enter the new desired size of your WINDOWS partition. NOTE: You are NOT specifying the size of your Ubuntu partition here. The available free space will be repartitioned in the next few steps for Ubuntu. For example: If your hard disk is 320 GB and you would like to reserve 290 GB for Windows and configure Ubuntu to use 30 GB of disk space, set the new partition size to 290 GB. This will leave 30 GB of free space that will be partitioned for Ubuntu. Click Continue.
- Select the partition labelled FREE SPACE and click Continue.
- Select Create a new partition and click Continue.
- A 1 GB swap partition is recommended in the event it is actually needed. Change the New partition size to be 1 GB less than the maximum partition size. In this example, the maximum is 30 GB, so enter 29 GB and click Continue. NOTE: Make sure to specify GB; if you enter 29 it will default to MB and not GB. Click Continue.
- Select Logical for the new partition and click Continue.
- Choose Beginning to create the partition at the beginning of the free space and click Continue.
- On the next page, all the values are set correctly. Select Done setting up the partition and click Continue.
- Again, select the partition labelled FREE SPACE and click Continue.
- Create a new partition and click Continue.
- Use all the free space remaining for the partition and click Continue.
- Choose Logical and click Continue.
- On the next page, select swap area for how to use the partition and click Continue.
- Select Done setting up the partition and click Continue.
- Select Finish partitioning and write changes to disk and click Continue.
- On the final screen, select Yes to write the changes to disk and click Continue.
- Select and install software: → No automatic updates.
- Software selection: Check Ubuntu desktop box (will take awhile).
- Configuring man-db: Install GRUB boot loader to master boot record.
- Finish the installation: System clock is set to UTC. You need to change to your current time zone. Do this by clicking the Time and Date Settings in the top right corner of your screen. In the Window that pops up enter Terre Haute in the location text box, overwriting "adark" or whatever else is already there. Wait a little while and the time will auto-update.
- Reboot.
With that said, if you choose to manually partition and have a swap partition that is less than the installed system memory, you will not be able to hibernate your laptop. Hibernate requires a swap partition that is at least equal to the amount of installed RAM. Standby will still work, however.
Here are instructions on manually creating the root and swap partitions:
Note: Don't Panic!
There is a bug with the 12.04 net installation that it does not complete the installation for language support. After the initial login you will see a window like the following:
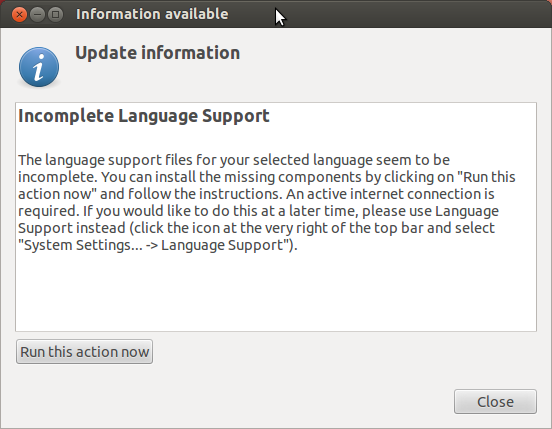
- Choose Run this action now and on the next window, select Install (your password will be required)
- Close both windows.
Install NVIDIA drivers:
There are a few options on how to configure the graphics driver:- installing Optimus package (Bumblebee) This will allow you to run both GPUs in your laptop (Intel and Nvidia) and will use less power (longer battery). The disadvantage is that you cannot connect to an external display (Projector or monitor) with the VGA port.
- installing Nvidia only This will allow you to connect to an external display with the VGA port, at the cost of the battery draining quicker.
For these reasons, it is recommended to use the Nvidia drivers.
- Press the Windows Key (a.k.a. Super Key) and type Terminal. Click on the Terminal program. A new Terminal window will open. In that window type wget tiny.cc/cssenvidia.
- In a terminal window, type "bash cssenvidia". Reboot when the script completes.
Congratulations on your Ubuntu installation!
- When your system boots into the newly installed Ubuntu, log in using the user name and password you selected earlier during installation.
- Congratulations! You are now running Ubuntu Linux.
- If you wish to configure any of the following, please follow these links for further documentation:
- Connecting to RHIT-1X wireless network
- Installing network printers
- Installng Thunderbird (email and calendar)
- Installing Pidgin (instant messaging client, with Lync contacts)