Working Around a Python-on-Windows Bug
One left-over oddity from the days of the MS-DOS operating system, is that Windows uses a different convention to indicate the end of lines of input. Unix, Linux, and Mac OS X use a single byte (with value 13) to indicate the end of a line. Windows uses two bytes (10 and 13). Somehow the combination of Eclipse, PyDev, Windows, and Python causes problems for programs that required console input. This step tells you how to avoid those problems. Based on an entry from the PyDev FAQ.
- Go to "Run > External Tools > External Tools Configurations ..."
-
Select Program on the left, then press the New Launch Configuration icon above it to create a new launch configuration.
-
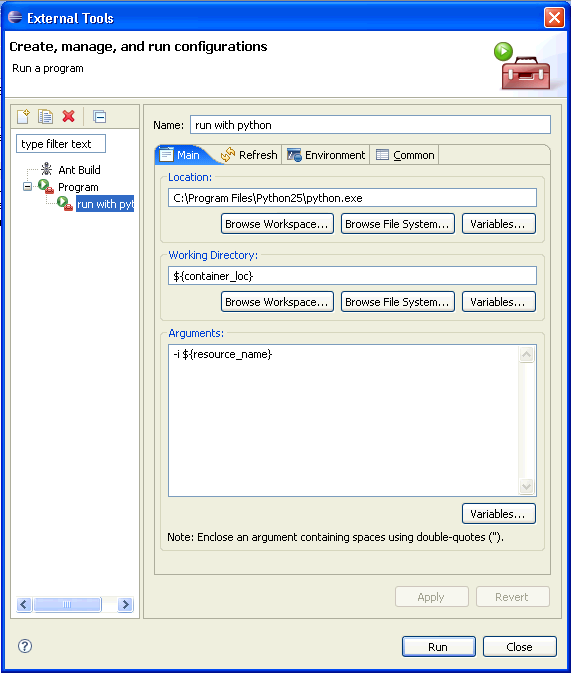
Enter the options as shown in the screenshot:
- Name: run with python
- Location: C:\Program Files\Python31\python.exe (assuming you installed it in that folder)
- Working Directory: ${container_loc} (This starts the shell in the directory where the currently selected Python module lives.)
- Arguments: -i ${resource_name} (This loads the currently selected module and then enters interactive mode, mimicking the behavior of Module → Run Module in IDLE.)
-
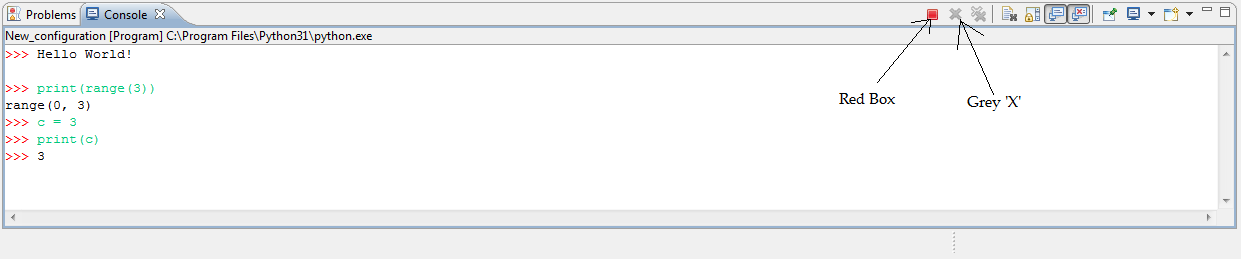
Select Run to start the shell. It should run in the console as shown below. If you get an error about the variable ${contain_loc} being undefined, that means you didn't have a Python module selected in the Project Explorer. Acknowledge the error, select a Python module, and try again.
-
Type
exit()in the shell, or click the red square (see figure), when you're done. Click the gray 'X' to close the shell history. If you don't want to enterexit()manually each time, you can add it to the end of your module code. -
To run the shell in the future, go to "Run > External Tools > run with python", or use the Run Using External Tool button
 in the Workspace toolbar.
Adding an Interactive Shell like IDLE Provides
This step gives you a way to experiment with the functions and classes you have declared. It allows you to run a Python interpreter in the Eclipse Console view with the “working directory” configured correctly so you can easily import the module you are editing. The instructions are much like those above; the differences are highlighted.
- Go to "Run > External Tools > External Tools ..."
-
Select Program on the left, then press the New Launch Configuration icon above it to create a new launch configuration.
-
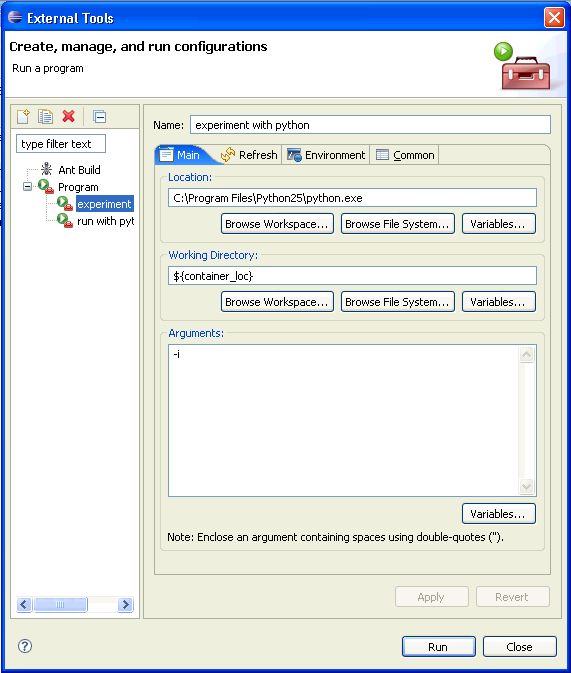
Enter the options as shown in the screenshot:
- Name: experiment with python
- Location: C:\Program Files\Python31\python.exe (assuming you installed it in that folder)
- Working Directory: ${container_loc} (This starts the shell in the directory where the currently selected Python module lives.)
- Arguments: -i (We don't include ${resource_name} this time because we just want to enter interactive mode without loading and running any module.)
-
Select Run to start the shell. It should run in the console as shown below. If you get an error about the variable ${container_loc} being undefined, that means you didn't have a Python module selected in the Project Explorer. Acknowledge the error, select a Python module, and try again.

- Once the shell starts, in the console view type import <moduleName> replacing <moduleName> with the name of your module, excluding the file extension. For example, you might type import greeting.
-
To run the experiments shell in the future, go to "Run > External Tools > experiment with python", or use the Run Using External Tool button
in the Workspace toolbar.